双系统安装配置
# 准备工作
当前准备安装 manjaro 的机器是联想小新pro, 已经装有正版 windows 11 系统。考虑到平时也会有用到 windows 办公的场景,所以准备安装双系统,日常使用 manjaro,manjaro 无法满足的场景再使用 windows。
- 刻录系统安装
U盘
此操作比较简单,直接使用dd命令刻录即可; 需要提前下载好manjaro系统安装iso文件1 2# 镜像放在当前目录下,U 盘插入刻录 iso 文件的 linux 系统,识别为 /dev/sdb; 如下命令操作 $ sudo dd if=./manjaro-kde-21.1.4-210927-linux513.iso of=/dev/sdb status=progress - 设置 BIOS 中
secure boot为disabled
进入BIOS设置,将secure boot设置为disabled,否则无法使用 U 盘装机; 现象是可以选择通过 U 盘启动,但进不了装机界面
# windows 操作内容
windows 默认把磁盘空间用完,需要在 windows 系统上调整分区大小,分出一块空间给 manjaro 使用
- 进入磁盘管理
右键windows图标,选择磁盘管理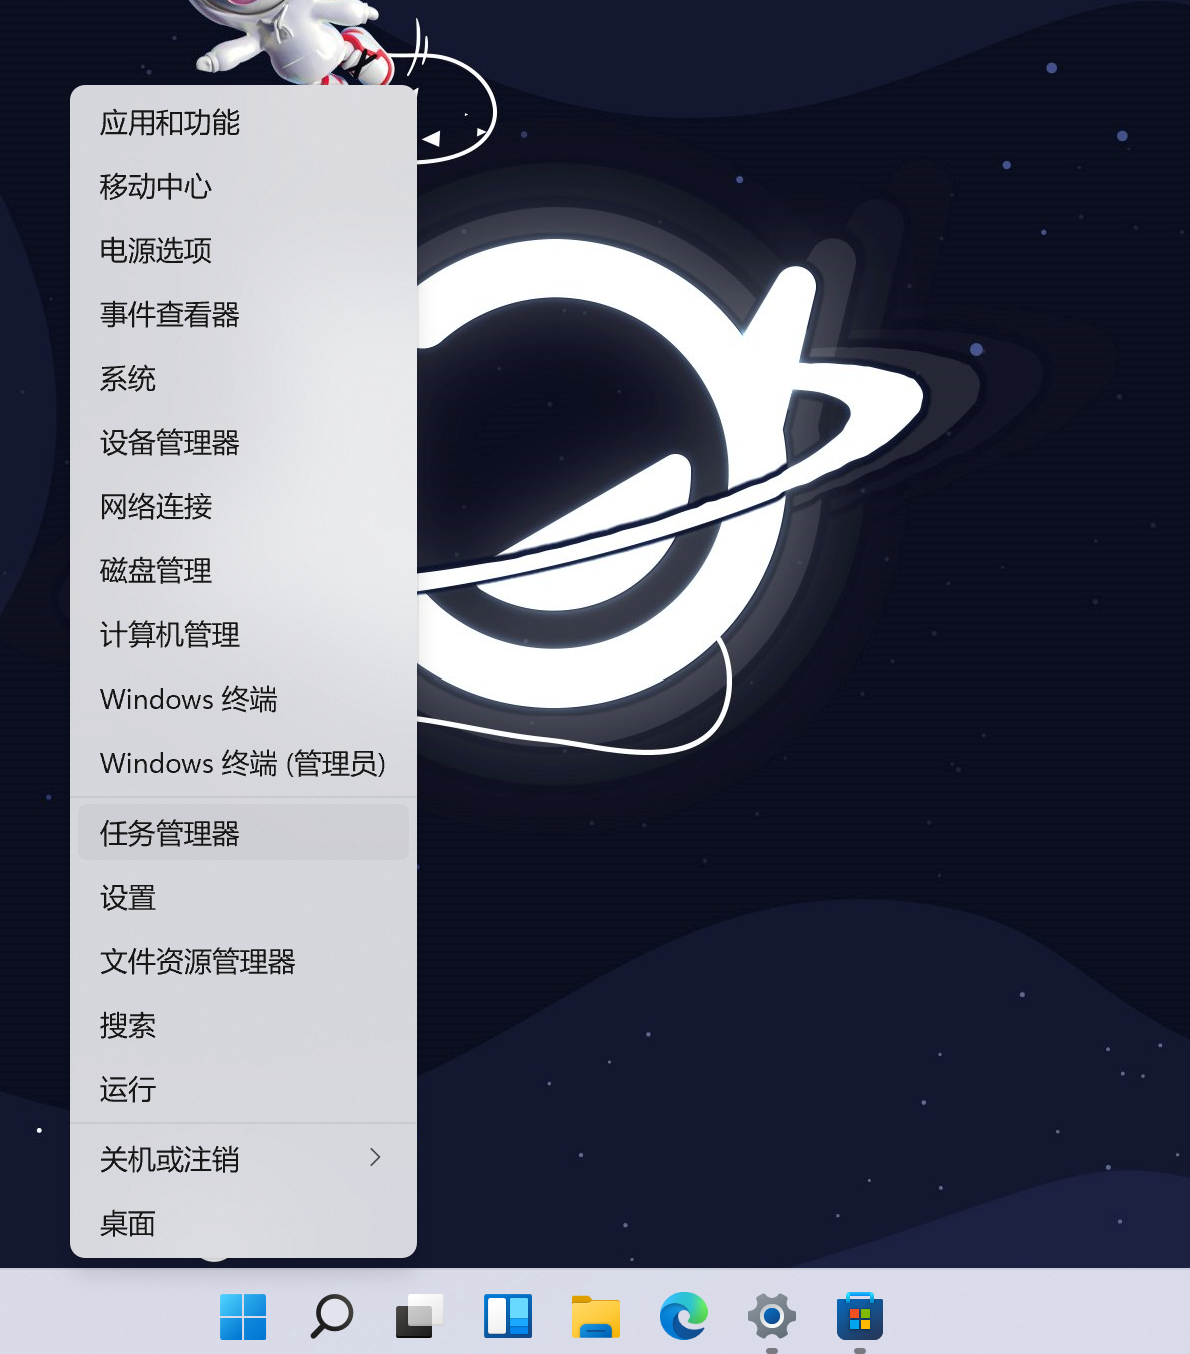
- 选择 D 盘进行缩容
C 盘空间不建议缩容,对 D 盘做缩容操作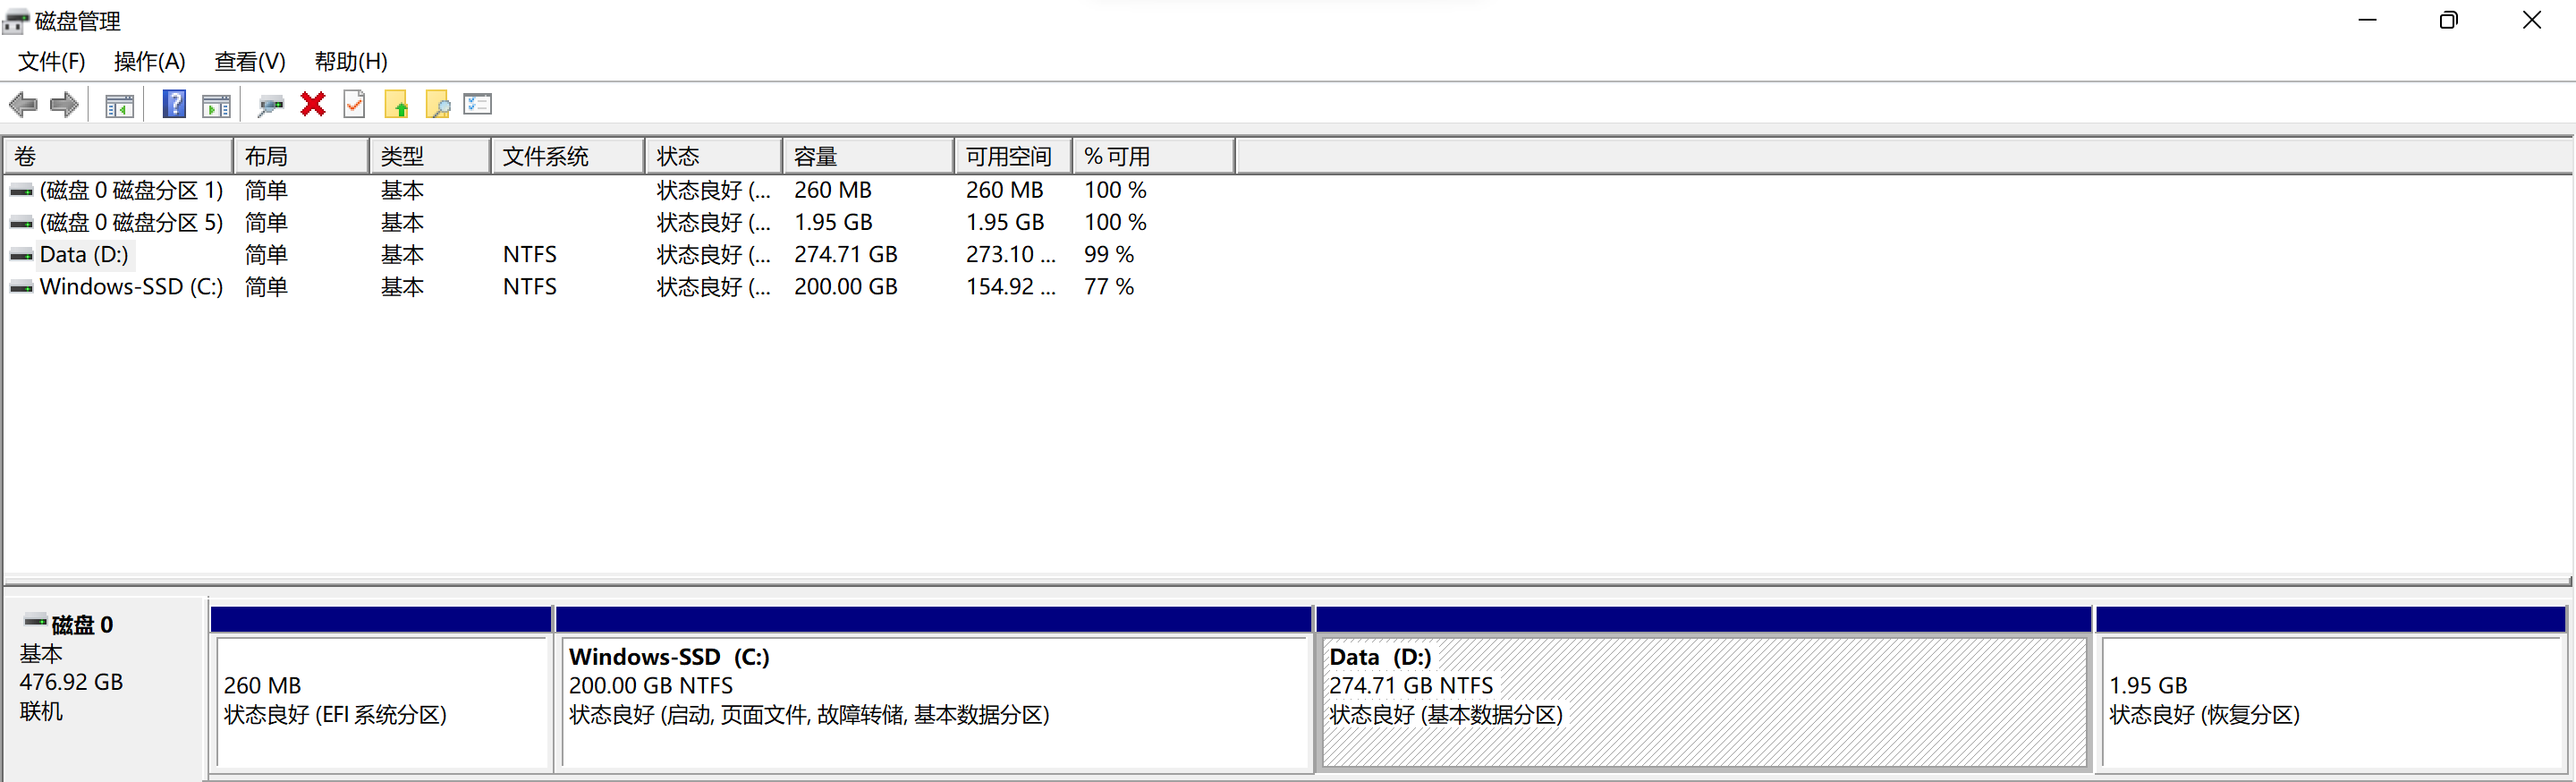
- 指定压缩卷空间大小即可
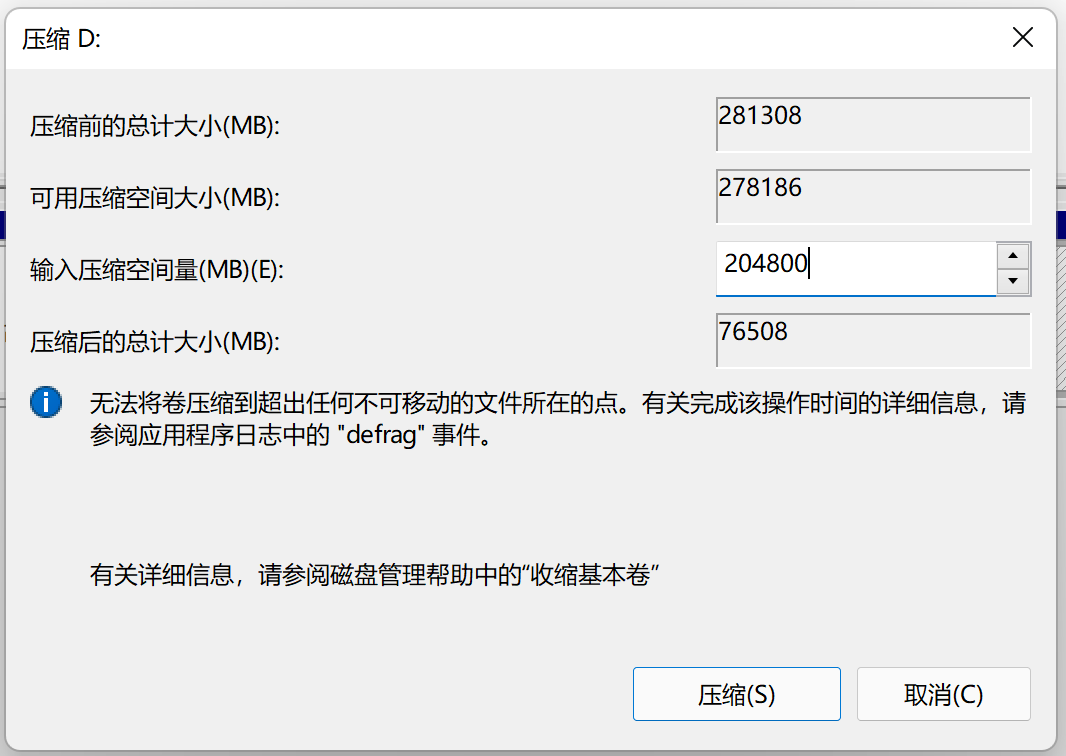
- 缩容后显示

# manjaro 系统安装
manjaro 安装后,需要保留 windows 的启动入口; linux 发行版安装系统时,默认会保留已有的 windows 启动入口; 反过来,先安装了 linux 发行版,再安装 windows 则不会保留 linux 的启动入口,需要自行修复。所以在给电脑安装双系统时,建议先装 windows 系统,再装 linux 系统。
进入安装入口
此处选择了通过开源驱动启动,下一项为通过专有驱动启动,建议有特殊硬件的设备选择这一项
磁盘分区选择
跳过前面的其他配置内容,磁盘分区需要细心配置,因为要保留windows的相应分区,此处选择在windows上缩容多出来的free space可用空间。Partitions/Replace a partition选中free space的分区。图片显示可以看出,
manjaro使用的仍然是nvme0n1p1分区作为/boot/efi的挂载分区,和windows是共用的。
分区完成 点击
next完成分区操作,然后点击install完成系统安装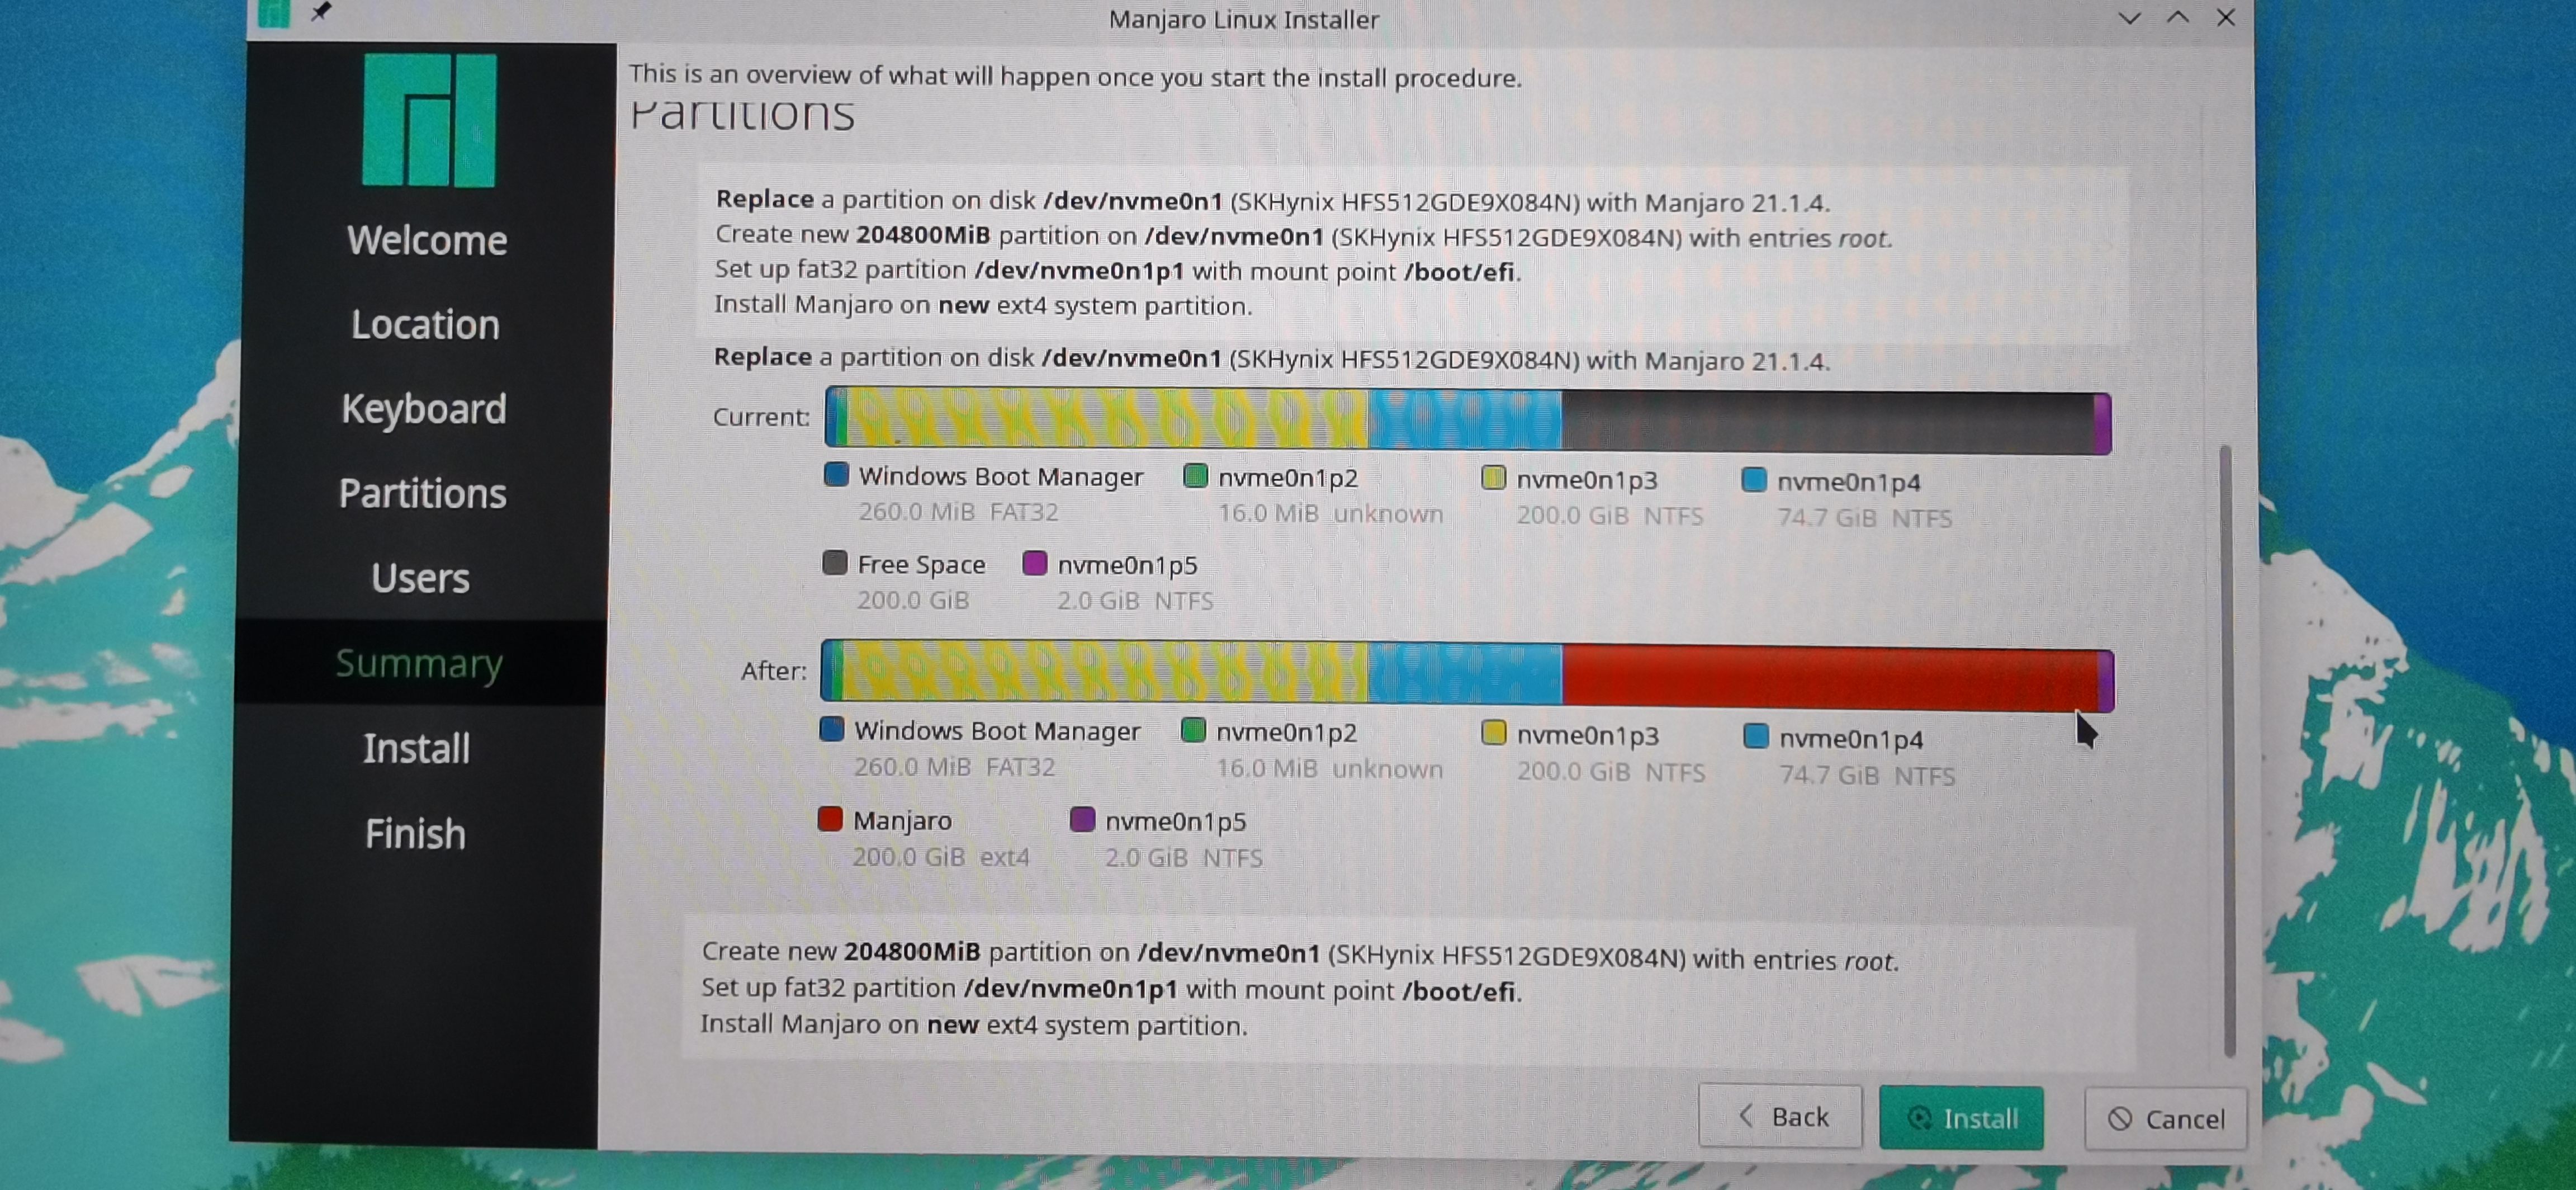
基础配置
# pacman 源地址修改
修改软件源,切换至国内,加快下载速度
# 修改前备份
$ sudo cp /etc/pacman.d/mirrorlist /etc/pacman.d/mirrorlist.backup

# 更新镜像源排名
$ sudo pacman-mirrors -i -c China -m rank
$ sudo cp /etc/pacman.conf /etc/pacman.conf.backup

# 添加ArchLinux中文社区源
$ sudo vi /etc/pacman.conf
[archlinuxcn]
SigLevel = Optional TrustedOnly
# 清华源
Server = https://mirrors.tuna.tsinghua.edu.cn/archlinuxcn/$arch
# 中科大源
#Server = https://mirrors.ustc.edu.cn/archlinuxcn/$arch

# 使配置生效
$ sudo pacman-mirrors -g

# 更新 pacman 数据库全面更新系统并签名
$ sudo pacman -Syyu && sudo pacman -S archlinuxcn-keyring

# 先安装一些包,后续其他需要配置的包单独说明
$ sudo pacman -S acpi vim yay
# 系统更新
使用 iso 镜像装完了系统,系统软件有些滞后,进行后续配置前,先更新一下系统软件
# 更新软件包
$ sudo pacman -Syyu
# sudo 配置免密
后续的很多配置都需要在命令行下操作,且需要 root 权限,设置 sudo 不需要输入密码,避免配置时总提示输入用户密码
# 切换到root用户
$ sudo -i

# 只需要配置10-installer文件即可,查看配置后的内容
$ sudo cat /etc/sudoers.d/10-installer
%wheel ALL=(ALL) NOPASSWD: ALL
# git 配置
安装 git
$ sudo pacman -S git
配置git
# 用户名
$ git config --global user.name "<username>"

# 邮箱
$ git config --global user.email "<mail-address>"

# 提交时转换为 LF,检出时不转换
$ git config --global core.autocrlf false
$ git config --global core.safecrlf false
$ git config --global core.autocrlf input

# 因为我的 trojan 代理 sock 端口是 1080
$ git config --global http.proxy socks5://127.0.0.1:7891
$ git config --global --add remote.origin.proxy ""
$ git config --global core.editor "vim"
# 字体配置
自己使用的系统语言配置是英文的,日常使用需要一些中文字体
# 安装中文字体
$ sudo pacman -S wqy-zenhei
$ sudo pacman -S wqy-bitmapfont
$ sudo pacman -S wqy-microhei
$ sudo pacman -S ttf-wps-fonts
$ sudo pacman -S adobe-source-han-sans-cn-fonts
$ sudo pacman -S adobe-source-han-serif-cn-fonts
# 时间同步配置
系统时区在系统安装时已经选择了,默认选择 Asia/Shanghai 就可以
# 若有调整需求,可以用下面命令调整,时区可以 tab tab 出来
$ timedatectl set-timezone Asia/Shanghai
自己的电脑是 windows 11 + manjaro 双系统,需要在 windows 下配置,让 windows 把硬件时间当作 UTC,避免双系统切换导致的时间错乱。
# Win + R 进入 cmd,以管理员身份运行后在命令行中输入下面命令并回车
<admin># Reg add HKLM\SYSTEM\CurrentControlSet\Control\TimeZoneInformation /v RealTimeIsUniversal /t REG_DWORD /d 1
在 manjaro 下设置硬件时间同步 utc 系统时间
# 设置硬件时钟同步系统 utc 时间
$ sudo hwclock --systohc --utc
UTC:Universal Time Coordinated,协调世界时
GMT:Greenwich Mean Time,格林尼治平时
windows 与 linux 缺省看待系统硬件时间的方式是不一样的:
- windows 把系统硬件时间当作本地时间(local time),即操作系统中显示的时间跟
BIOS中显示的时间是一样的。 - linux/unix/mac 把硬件时间当作 UTC,操作系统中显示的时间是硬件时间经过换算得来的,比如说北京时间是GMT+8,则系统中显示时间是硬件时间+8。
# 中文输入法配置
使用 fcitx5管理输入法
# 安装 Fcitx5 主体、配置工具、输入法引擎及中文输入法模块
$ sudo pacman -S fcitx5-im fcitx5-chinese-addons fcitx5-qt fcitx5-gtk

# 配置用户家目录下 pam 环境变量文件,(为了对齐,中间是一个 Tab 键)
$ cat ~/.pam_environment
GTK_IM_MODULE DEFAULT=fcitx
QT_IM_MODULE  DEFAULT=fcitx
XMODIFIERS    DEFAULT=\@im=fcitx
INPUT_METHOD  DEFAULT=fcitx
SDL_IM_MODULE DEFAULT=fcitx

# 若出现无法配置的情况,建议安装软件包 manjaro-asian-input-support-fcitx5
$ sudo pacman -S manjaro-asian-input-support-fcitx5
注销后登陆,输入法显示出来了,进入云拼音和标点符号的配置
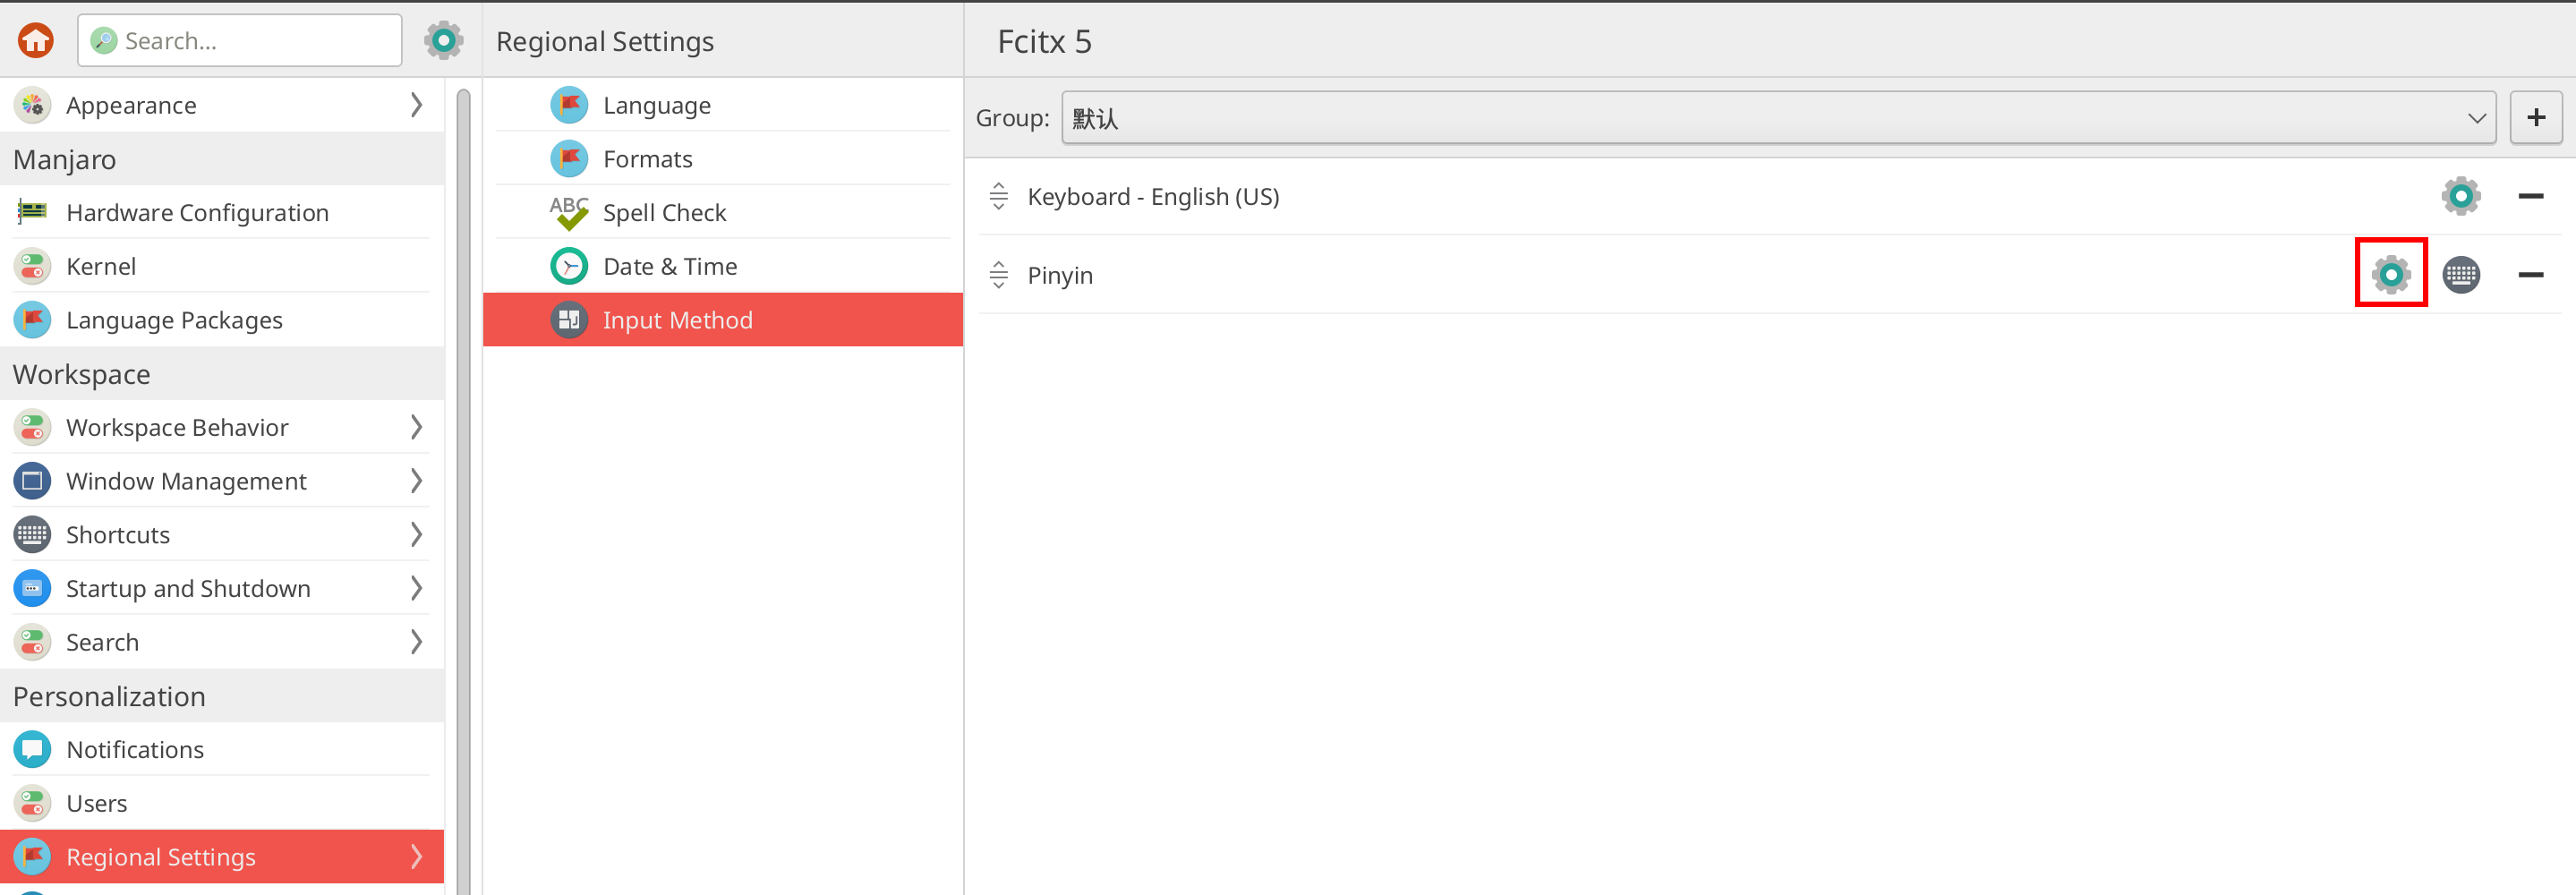
入口:system settings/regional settings/input method
或者直接在系统托盘的键盘图标右键点击配置

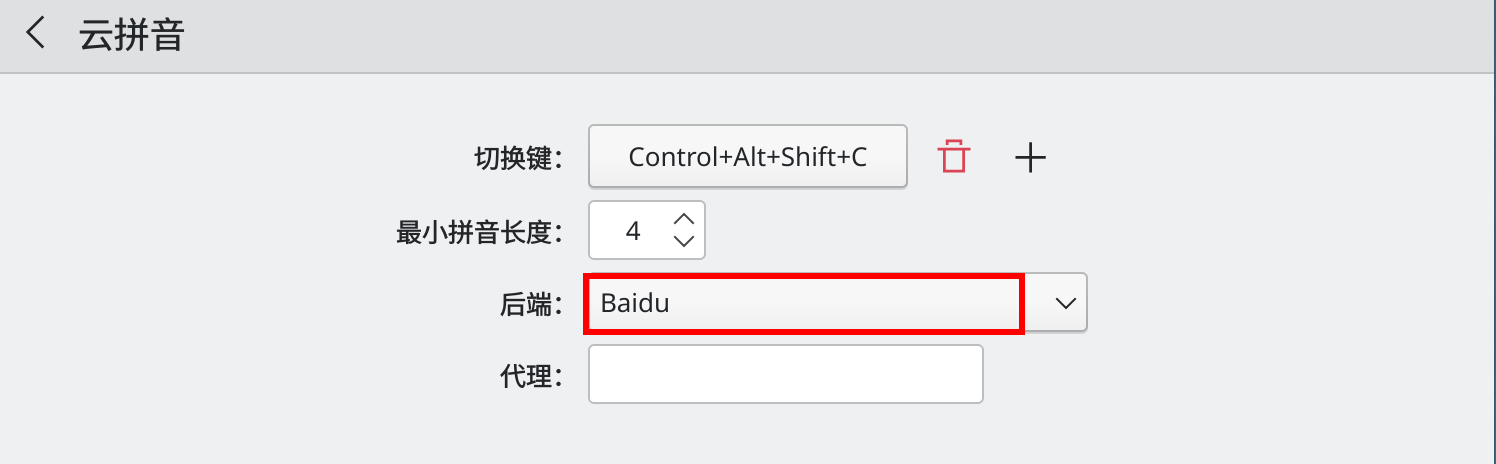
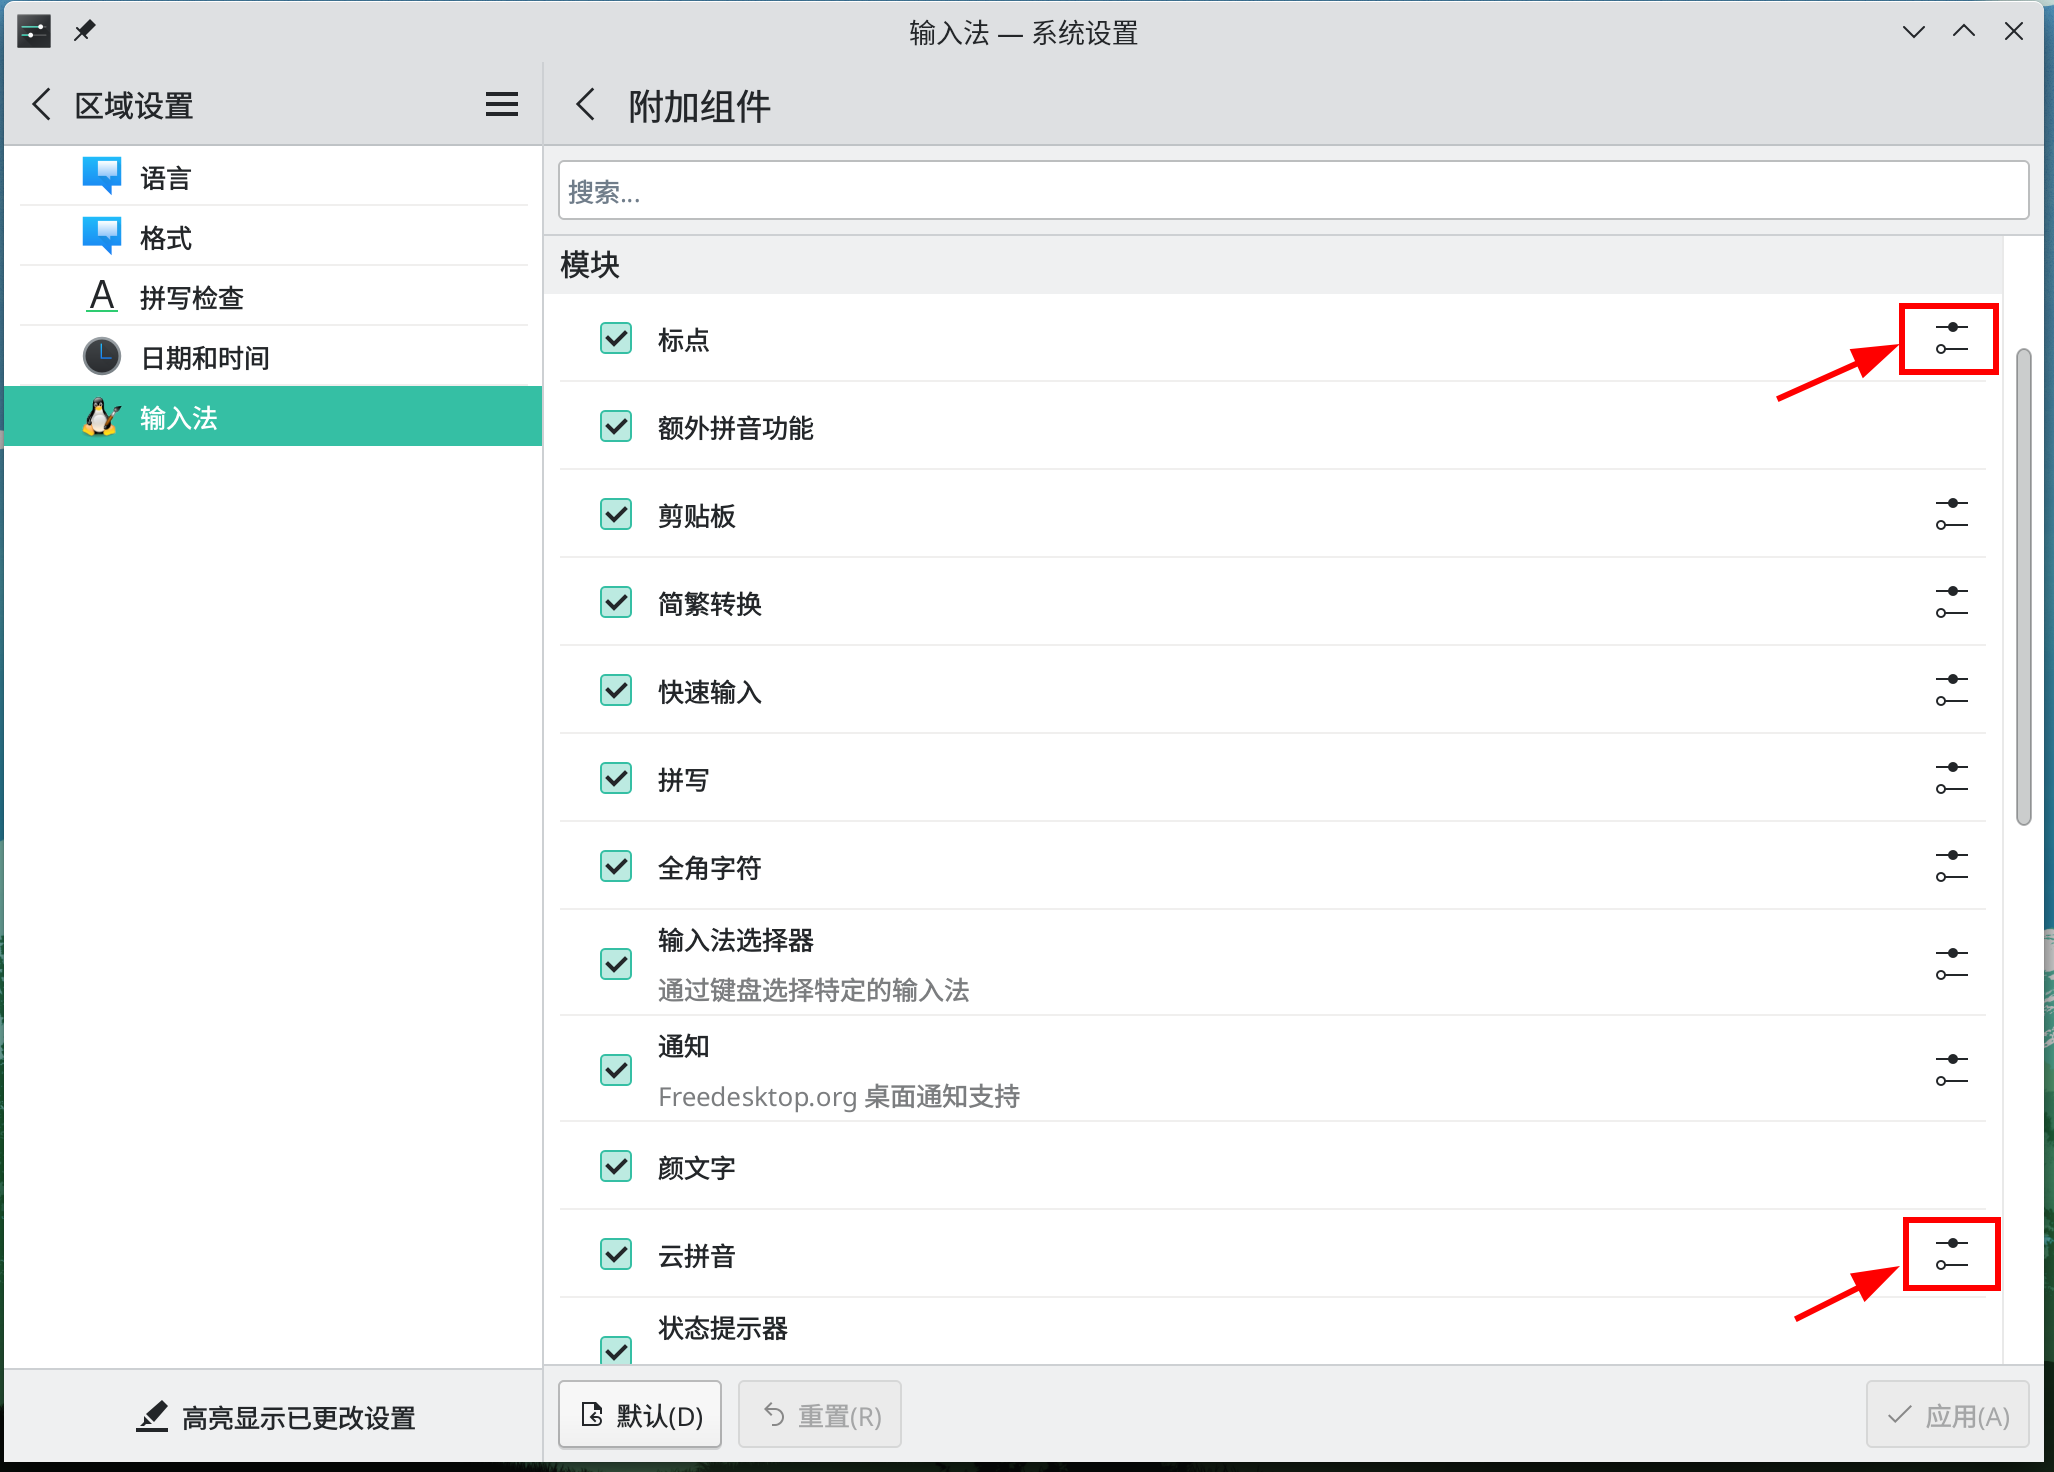 调整云拼音的后端,也即云端词库,选择
 Baidu ,google 不一定用的了
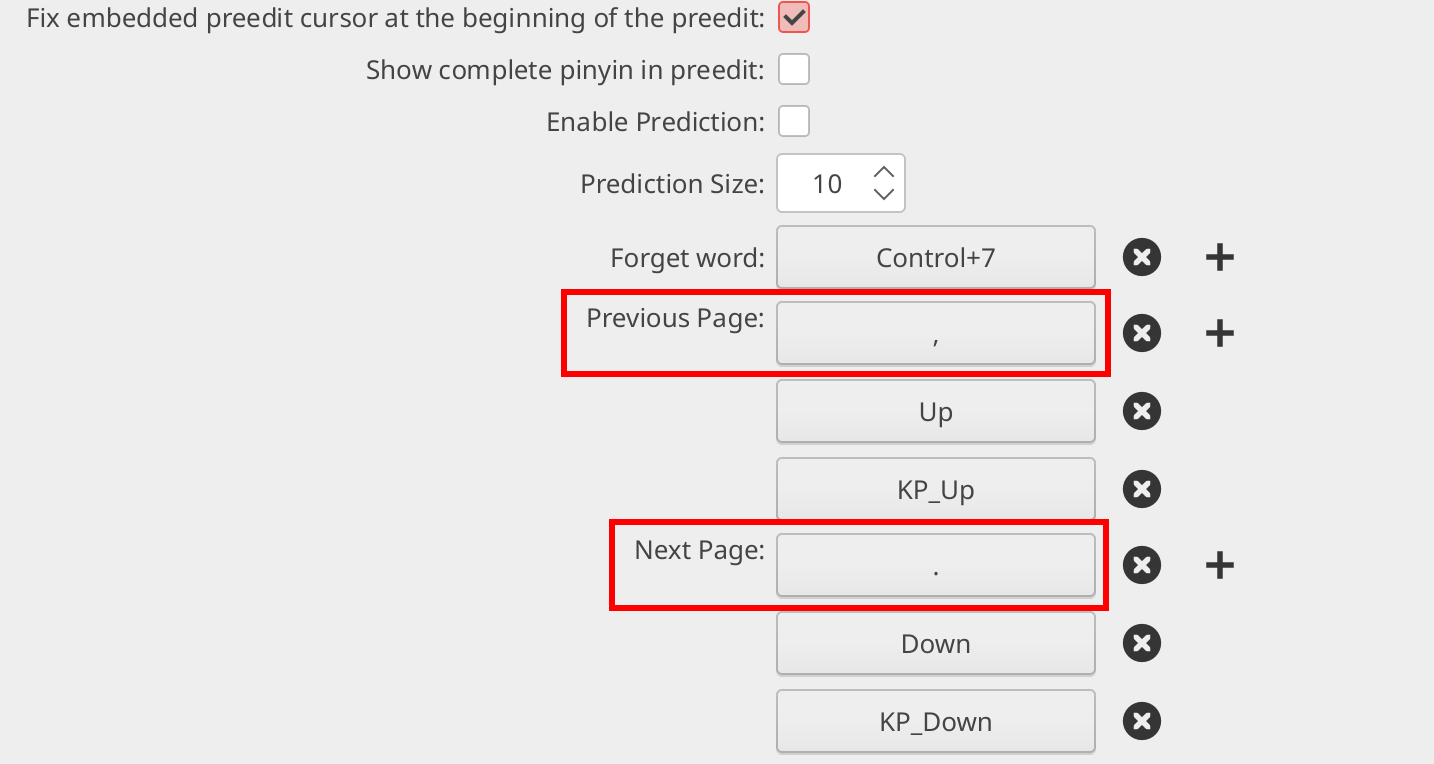
 修改pinyin的切换候选词配置,默认是上下,需要调整配置到
,/.。
# 命令历史记录配置
终端上可能会同时开启几个 tab,如果在多个 tab 上都有执行命令的话,.bash_history 不一定能保留所有的命令历史记录,需要单独配置来记录所有 tab 上执行的命令
# 在 /etc/profile 中添加如下内容
$ tail -2 /etc/profile
export HISTORY_FILE="/var/log/CMD_all.log"
export PROMPT_COMMAND='{ thisHistID=`history 1|awk "{print \\$1}"`;lastCommand=`history 1| awk "{\\$1=\"\" ;print}"`;user=`id -un`;whoStr=(`who -u am i`);realUser=${whoStr[0]};logMonth=${whoStr[2]};logDay=${whoStr[3]};pid=${whoStr[5]};ip=${whoStr[6]};if [ ${thisHistID}x != ${lastHistID}x ];then echo -E `date "+%Y/%m/%d %H:%M:%S"` $user\($realUser\)@$ip[Pid:$pid][LoginTime:$logMonth $logDay] ExecuteCommand: $lastCommand;fi; } >> $HISTORY_FILE'

# 先生成日志文件,并修改其权限配置
$ sudo touch /var/log/CMD_all.log
$ sudo chmod 666 /var/log/CMD_all.log

# 重新加载 /etc/profile 文件,使配置生效
$ source /etc/profile

# 后续需要查找之前执行的命令,可以直接执行命令
$ cat /var/log/CMD_all.log | grep <item>
软件的安装配置
# 安装配置 virtualbox
# 获取当前内核版本
$ mhwd-kernel -li
Currently running: 5.15.28-1-MANJARO (linux515)
The following kernels are installed in your system:
 * linux515

# 安装 virtualbox
$ sudo pacman -Syu virtualbox linux515-virtualbox-host-modules

# 自己下载镜像,在 virtualbox 上安装系统,保存快照,以后就可以基于快照生成虚拟机
# 安装远程工具
日常工作在 manjaro 上,连接其他 windows 主机或 linux 主机,需要用到 vnc 和 rdp 工具
# 安装 rdp 工具 remmina
$ sudo pacman -S remmina

# 安装 vnc 工具
$ yay -S realvnc-vnc-viewer
# 安装下载工具
日常下载工具,aria2c + uget
$ sudo pacman -S aria2 uget
# 安装 onedrive
onedrive 是难得不用翻墙可以访问的网盘,自己用的比较多,需要在 manjaro 上使用
$ yay -S onedrive-abraunegg
安装完成后,需要配置认证
$ onedrive --reauth
需要自己生成 service 文件
$ systemctl cat onedrive.service
# /usr/lib/systemd/system/onedrive.service
[Unit]
Description=OneDrive Free Client
Documentation=https://github.com/abraunegg/onedrive
After=network-online.target
Wants=network-online.target

[Service]
# Commented out hardenings are disabled because they may not work out of the box on your distribution
# If you know what you are doing please try to enable them.

ProtectSystem=full
#PrivateUsers=true
#PrivateDevices=true
ProtectHostname=true
#ProtectClock=true
ProtectKernelTunables=true
#ProtectKernelModules=true
#ProtectKernelLogs=true
ProtectControlGroups=true
RestrictRealtime=true
ExecStart=/usr/bin/onedrive --monitor --monitor-interval 60
Restart=on-failure
User=liawne
Group=liawne
RestartSec=3
RestartPreventExitStatus=3

[Install]
WantedBy=default.target

$ sudo systemctl daemon-reload
$ sudo systemctl enable onedrive.service
安装配置完成后,默认会在 ~ 下生成文件夹 OneDrive,同步云端文件。
# 安装密码管理工具
密码管理使用的是 keepass 系,KeePassXC + KeePass2Android + KeePassXC-Browser
$ sudo snap install keepassxc
安装完成后,用软件打开已经归档的 kdbx 文件即可。
# 安装 chrome 浏览器
不是很习惯使用火狐,下载 google-chrome
$ yay -S google-chrome
安装 switchomega-proxy 插件,登陆 google 帐号,开启同步功能后,会自动将 chrome 的配置和书签同步过来。
安装 KeePassXC-Browser 插件,用来和 KeePassXC 协同管理密码; 系统只需要已经安装配置好 KeePassXC,打开浏览器,插件基础配置一下即可使用
- 关闭系统的
Kwalletd密码管理工具。 KeePassXC开启浏览器集成功能- 对于
linux上由snap安装的KeePassXC,需要再下载一个脚本,执行后才能和插件对接
登陆谷歌帐号需要翻墙,见下面翻墙配置内容
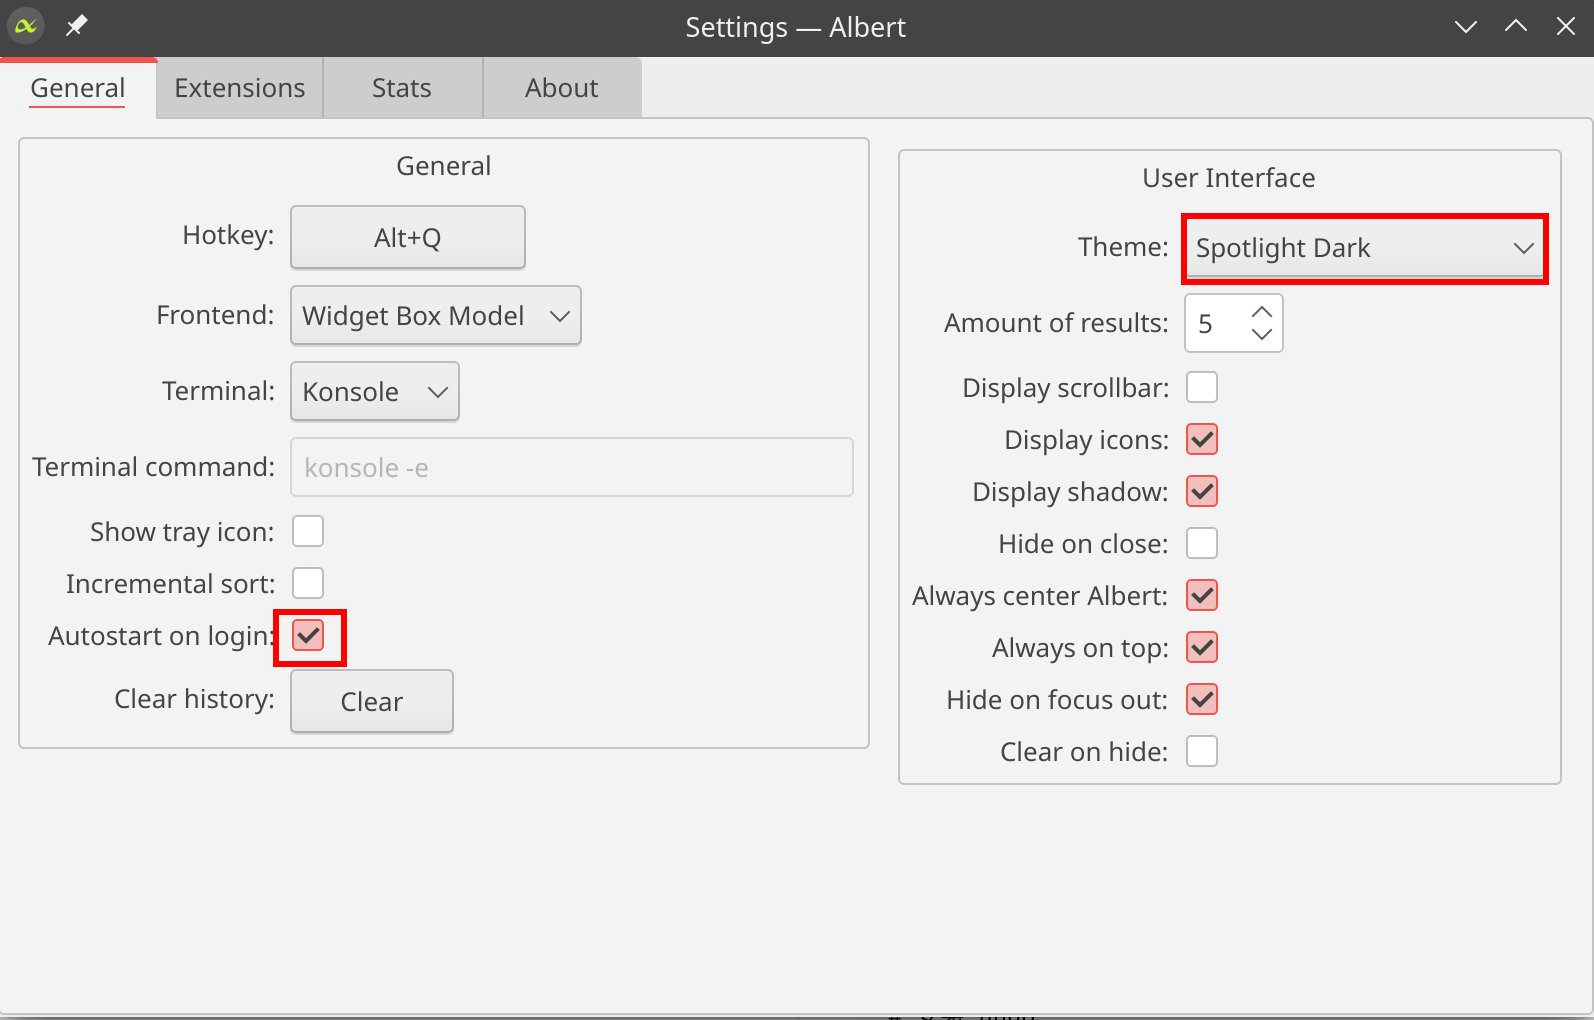
# 安装配置 albert
albert 是一个快速加载工具,开启相应支持后,可以很方便的打开文件、软件、链接等各种内容,功能类似于 windows 上的 everything; 可以简省很多快捷键配置、减少找文件的时间
# 安装 albert
$ yay -S albert-bin
安装完成后,打开 albert 配置界面,设置快捷键、主题、开机自启、及开启各个插件支持,主题选择了spotlight dark
albert 可能出现的问题
## 场景一、快捷键调用一次后失效,albert 无法再次触发,日志中有报错内容
[fatal:default] SQL ERROR: INSERT INTO execution (query_id, handler_id, runtime) VALUES (:query_id, :handler_id, :runti
me); UNIQUE constraint failed: execution.query_id, execution.handler_id Unable to fetch row  --  [(null)]

# 修复动作
$ rm ~/.config/albert/core.db
# 开发 IDE
日常使用到的有 vscode,pycharm,直接安装就好
$ yay -S pycharm-community-eap vscode
# 安装 pyenv
pyenv 可以在多个版本的 python 之间轻松切换,日常使用如果同时要用到 python2 和 python3,安装配置 pyenv 会很方便
# 下载最新版的 pyenv 到家目录下
$ git clone https://github.com/pyenv/pyenv.git ~/.pyenv

# 进入家目录,进行编译
$  cd ~/.pyenv && src/configure && make -C src

# 添加相应的环境变量到 ~/.bashrc中
$ sed -Ei -e '/^([^#]|$)/ {a \
  export PYENV_ROOT="$HOME/.pyenv"
  a \
  export PATH="$PYENV_ROOT/bin:$PATH"
  a \
  ' -e ':a' -e '$!{n;ba};}' ~/.profile
$ echo 'eval "$(pyenv init --path)"' >>~/.profile
$ echo 'eval "$(pyenv init -)"' >> ~/.bashrc

# 下载 virtualenv 插件到 pyenv 的插件目录下
$ git clone https://github.com/pyenv/pyenv-virtualenv.git $(pyenv root)/plugins/pyenv-virtualenv

# 添加环境变量到 ~/.bashrc 中
$ echo 'eval "$(pyenv virtualenv-init -)"' >> ~/.bashrc

# 重启 bash,加载 virtualenv
$ exec $SHELL
使用 pyenv 管理多版本 python 时可能用到的一些特殊变量:
Special environment variables
You can set certain environment variables to control pyenv-virtualenv.
PYENV_VIRTUALENV_CACHE_PATH, if set, specifies a directory to use for caching downloaded package files.
VIRTUALENV_VERSION, if set, forces pyenv-virtualenv to install the desired version of virtualenv. If virtualenv has not been installed, pyenv-virtualenv will try to install the given version of virtualenv.
GET_PIP, if set and venv is preferred over virtualenv, use get_pip.py from the specified location.
GET_PIP_URL, if set and venv is preferred over virtualenv, download get_pip.py from the specified URL.
PIP_VERSION, if set and venv is preferred over virtualenv, install the specified version of pip.
PYENV_VIRTUALENV_VERBOSE_ACTIVATE, if set, shows some verbose outputs on activation and deactivation
安装和配置
virtualenv# 安装指定版本的 python $ pyenv install 2.7.15 -v # 在 指定的目录下,使用基于指定 python 版本的 virtualenv # 如下,会在目录 my-virtual-env-2.7.10 下创建一个基于 $(pyenv root)/versions 中 2.7.10 版本 python 的 virtualenv $ pyenv virtualenv 2.7.10 my-virtual-env-2.7.10 # 从指定版本创建 virtualenv $ pyenv virtualenv 2.7.16 py27 # 激活/释放 virtualenv $ pyenv activate <name> $ pyenv deactivate # 删除 virtualenv $ pyenv uninstall my-virtual-env $ pyenv virtualenv-delete my-virtual-env
# 博客使用
日常写博客用的是 hugo,图床用的是阿里云OSS,图片上传到图床的工具用 picgo
# 安装 hugo
$ sudo pacman -S hugo

# 安装 picgo
$ yay -S picgo
markdown 文件中包含了中英文和数字,美观起见,互相之间应该加一个空格。除了在写的时候注意调整,还可以使用 textlint 来检查和修改,如下方式进行配置:
# 安装 textlint
$ npm install textlint --global
$ npm install textlint-rule-ja-space-between-half-and-full-width --global
$ cd ~ && textlint --init

# 配置 .textlintrc 配置文件
$ cat .textlintrc
{
  "filters": {},
  "rules": {
      "ja-space-between-half-and-full-width": {
          "space": "always"
      }
  }
}

# 使用 textlint 检查
$ textlint *.md

# 使用 textlint 修复
$ textlint --fix *.md
# 安装 wps
marjaro 无法使用 office套装(可能也可以,自己没找到可用的方式),libreoffice 自己用的不习惯,选了 wps 做替代
# 安装 wps, 建议英文界面下安装 wps-office, 安装 wps-office-zh 后使用过程中碰到过一些报错
$ yay -S wps-office
# 安装笔记工具
日常笔记工具,obsidian
$ yay -S obsidian
安装完成后,继续安装第三方插件时,可能提示无法连接网络,需要离线下载好 obsidian-proxy-github 插件进行安装:
- 解压下载好的
obsidian-proxy-github.zip - 将解压的文件夹放入笔记目录下的插件目录内。如:
XXX/.obsidian/plugins - 重启
obsidian
# 离线剪藏文件配置
dropbox
安装 dropbox, 将保存在本地的剪藏目录作为同步目录(首选项中配置)
# 直接安装
$ yay -S dropbox
安装完成后,因为需要翻墙访问,须自行配置
singlefilechrome 或者 firefox 上插件,直接安装即可
安装后在选项中调整了保存文件名称,使用日期开头,方便整理归档
开机自启服务singlefile 默认的的文件保存位置为 chrome 的文件下载位置,没找到调整的方式
当前采用 inotifywait 监听目录文件变化,触发文件移动的方式来实现下载后,将文件移动至 dropbox 归档目录
| |
# 安装网易云音乐
日常听歌使用
$ yay -S netease-cloud-music
# 安装街机模拟器 mame
街机游戏
$ sudo pacman -S mame
# 安装 xmind-2020
思维导图使用
# xmind-2020 需要使用 snap 进行安装,manjaro 系统安装完成后已经有 snap 了; 若没有,则按以下方式进行配置
$ sudo pacman -S snapd
$ sudo systemctl enable --now snapd.socket
$ sudo ln -s /var/lib/snapd/snap /snap

# 安装 xmind-2020
$ sudo snap install xmind
xmind-2020 个人使用可以不用激活,感觉没有增强功能也足够使用了
易用性/界面优化
需要使用到的一些配置文件/工具,已经提前准备好,直接拷贝到机器上。包括有:
- 配置文件
.bashrc:个人用户使用的bash配置文件,包括一些配置的别名、环境变量等.vimrc:个人用户使用的vim配置文件,包括缩进、语法高亮、插件、主题等.tmux.conf:tmux的配置文件,tmux的一些配置shell_init.tar.gz:自己使用的一些终端banner,可以不用管
- 需要网上找,直接本地备份的一些文件
Trojan-Qt5-Linux.AppImage:trojan-qt5,服务器延迟不稳定但能使用,不是很适合clash,还是用trojan了Proxy-SwitchyOmega-Chromium.crx:chrome的代理插件
# yakuake/tmux/bash/vim 配置
bash/vim 配置很简单,直接将 .bashrc 和 .vimrc 文件拷贝到用户家目录下即可。
# shell_init.tar.gz是自己使用的一些内容,就不放出来了
$ tar xf ./shell_init.tar.gz
$ mv .english* ~/
$ mv ./{.vimrc,.bashrc} ~/
配置 yakuake 和 tmux
# yakuake 在 manjaro 安装时已经自带,可以不用安装;
# 安装 tmux
$ sudo pacman -S tmux
将自己备份的 tmux.conf 文件拷贝到用户家目录下,重命名为 .tmux.conf。拷贝 tmux 配置文件生效后,需要配置 yakuake, 因为 tmux 配置中 Alt + <num> 的配置占用了yakuake的快捷键,不配置的话无法在 yakuake 中切换 tab。如下所示进行配置(yakuake/config keyboard shortcuts):

顺带把 yakuake 主题和边框都调整好
# 调整终端的配置(profile)
manjaro 安装完成后,终端默认的配置方案(profile)不是很喜欢,新增配置方案(最初默认的profile修改了不能保存),配置好后将其设置为默认的配置方案
- 新建
profile(konsole/settings/manage profiles/new)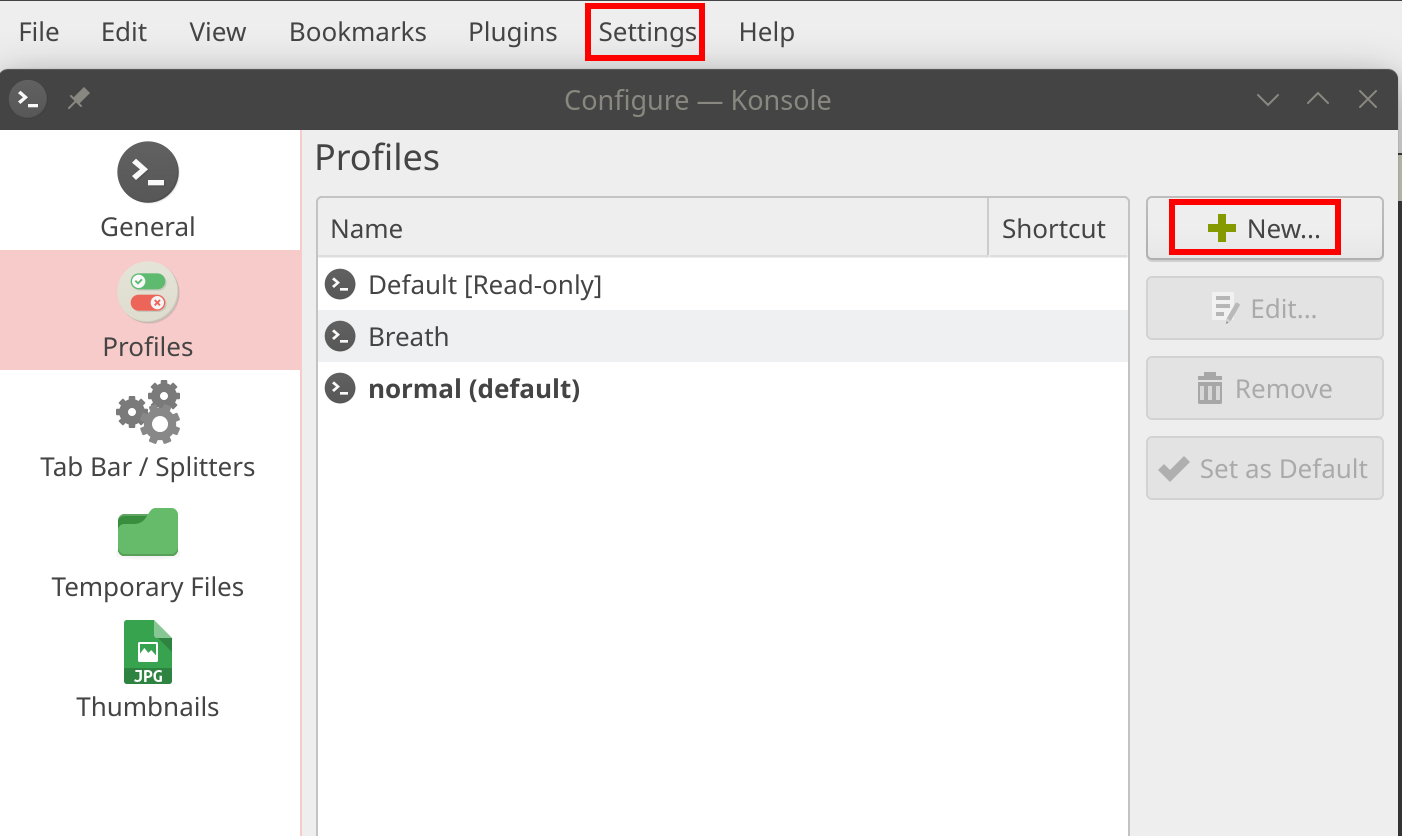
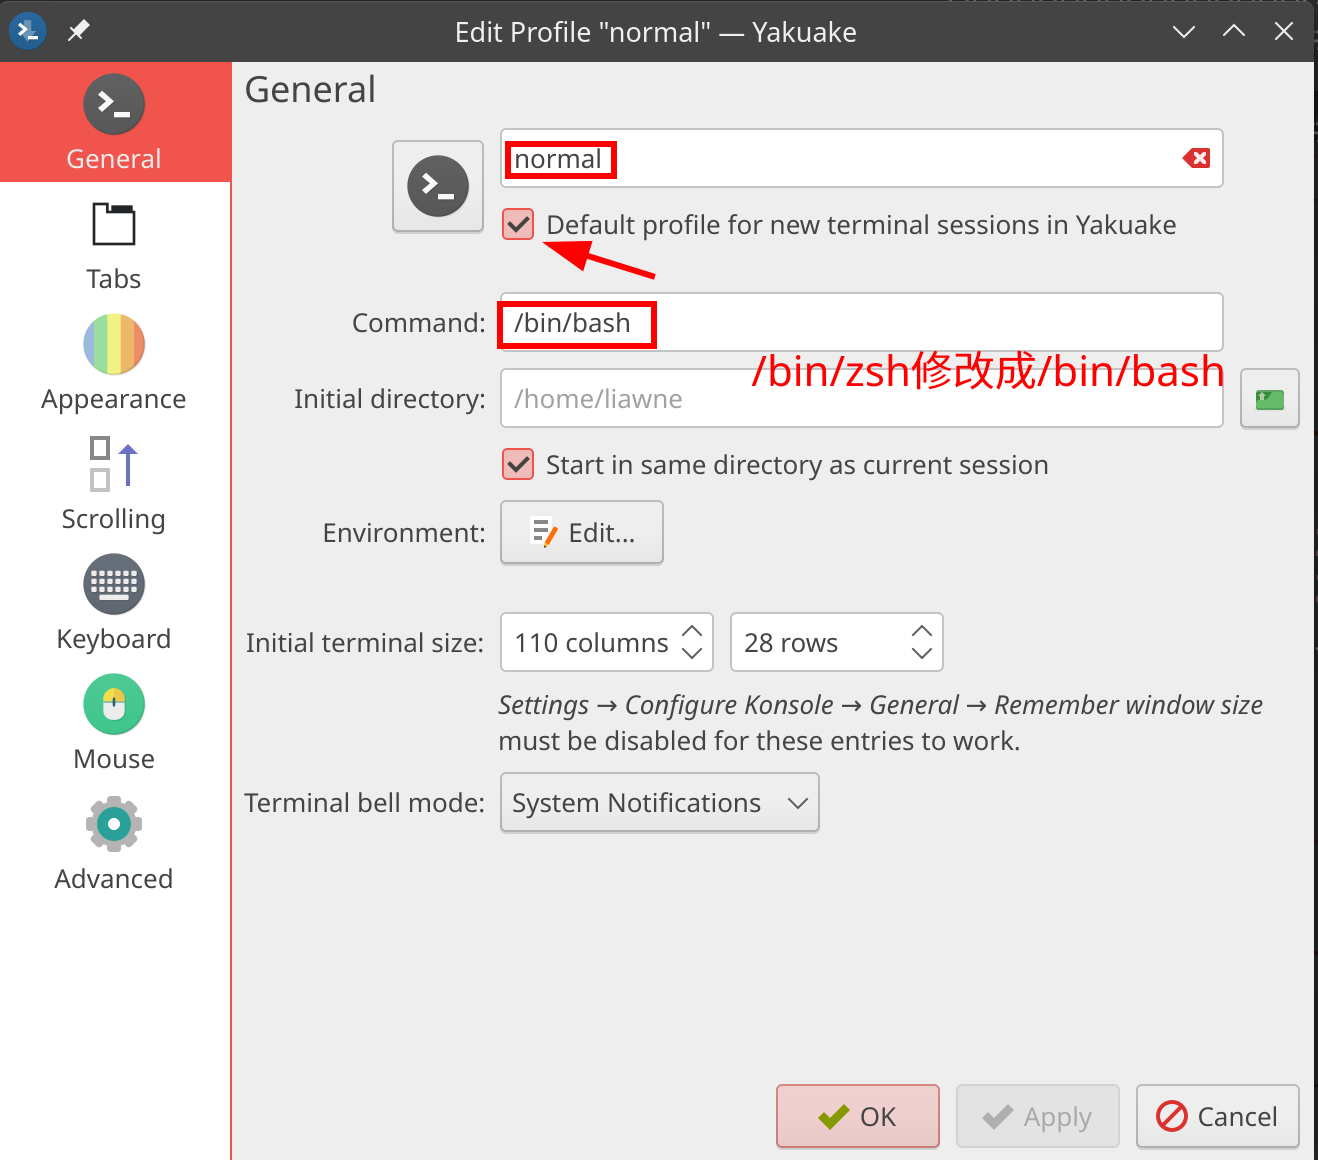
- 选择配置方案及字体
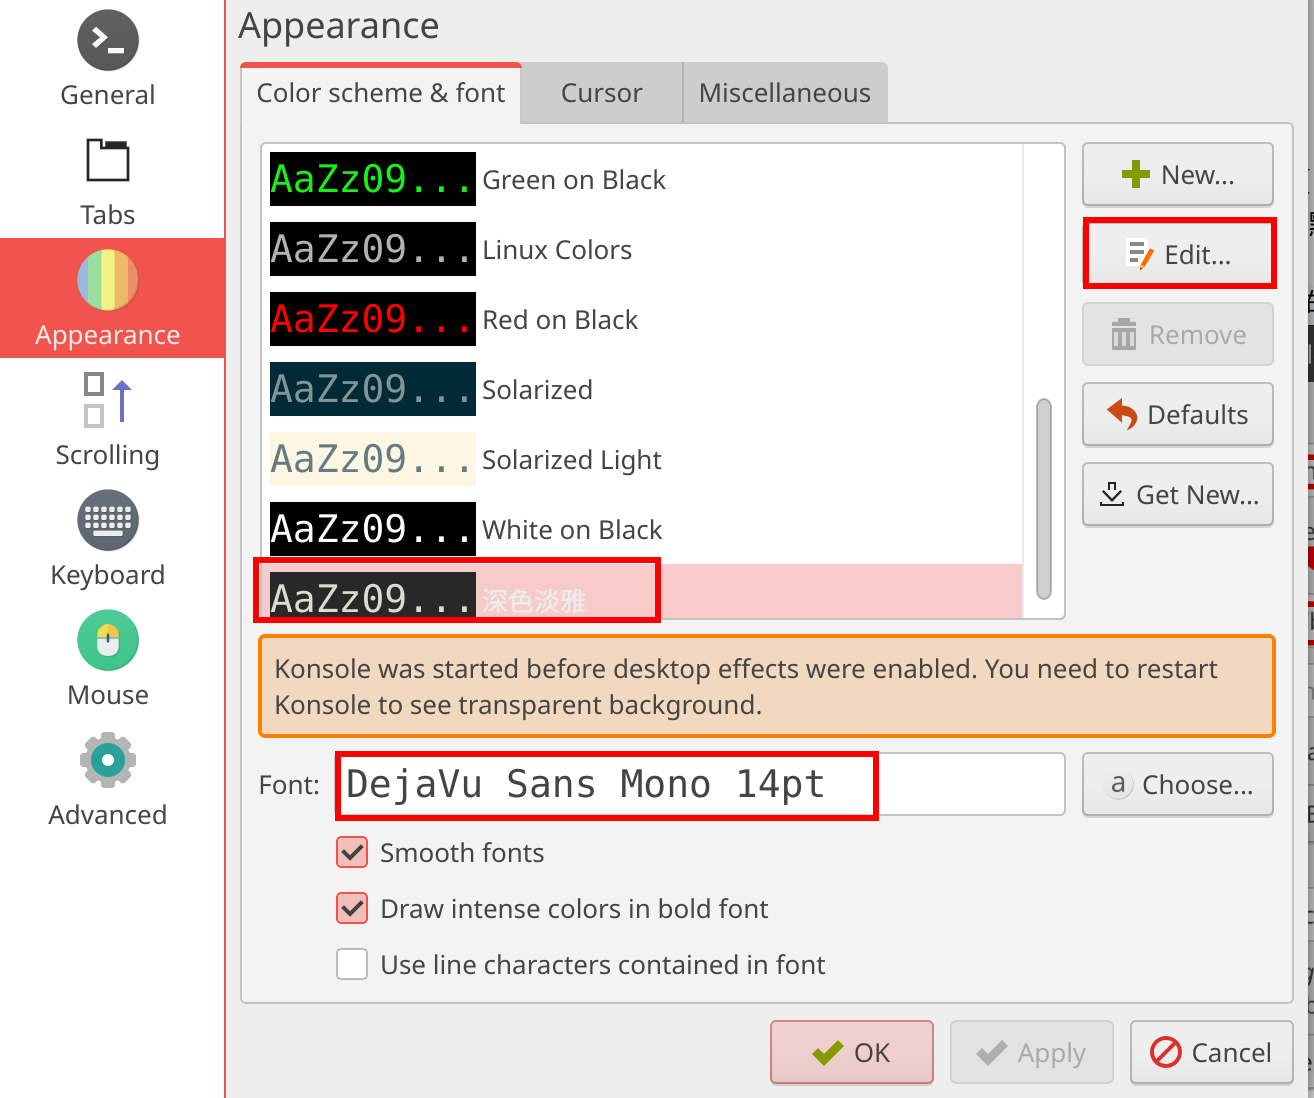
- 鼠标选中复制

# 配置翻墙
使用 trojan
翻墙软件自己使用的是 trojan-qt5 的 AppImage 版本,这个可以在网上自行搜索下载。不想配置全局代理,还可以安装 provixy
# 将下载的 appimage 文件放到 /tmp 下
$ mv Trojan-Qt5-Linux.AppImage /tmp
$ chmod +x /tmp/Trojan-Qt5-Linux.AppImage

# 创建自定义的 AppImage 存储目录
$ mkdir ~/.Applications

# 运行 AppImage
$ /tmp/Trojan-Qt5-Linux.AppImage

# 配置 trojan 开机自启,创建软链接
$ sudo ln -s /home/<username>/.Applications/Trojan-Qt5-Linux_cb059cf83989c64d7d13dd501bcd6b62.AppImage /usr/bin/trojan

# 配置 trojan 开机自启,生成 autostart 文件
$ cat /home/<username>/.config/autostart/trojan.desktop
[Desktop Entry]
Exec=/usr/bin/trojan
Icon=dialog-scripts
Name=trojan
Path=
Type=Application
X-KDE-AutostartScript=true
第一次执行 AppImage 时,会要求确认 applications 存放的位置,设置存储路径到~/.Applications。
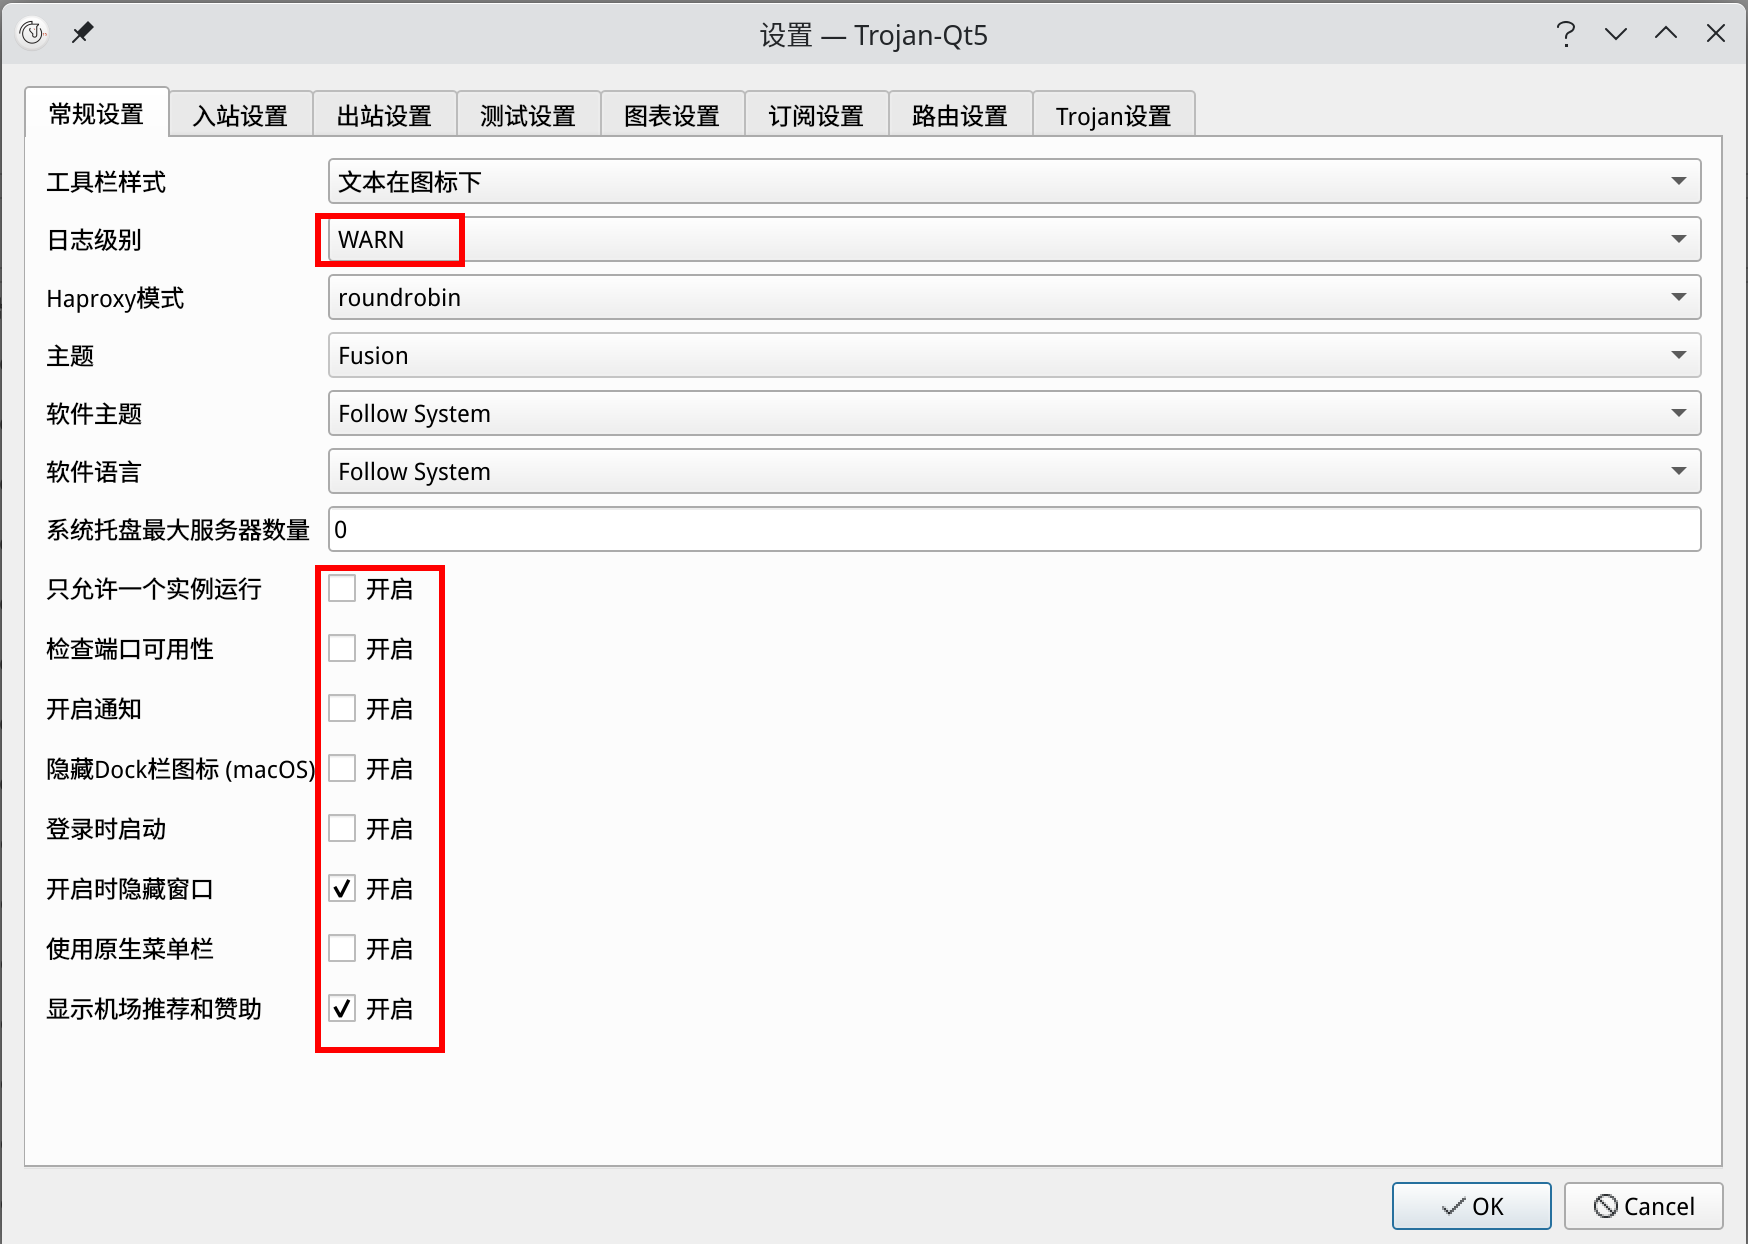
导入gui-config.json文件,配置 trojan(settings/General settings)
- 常规设置
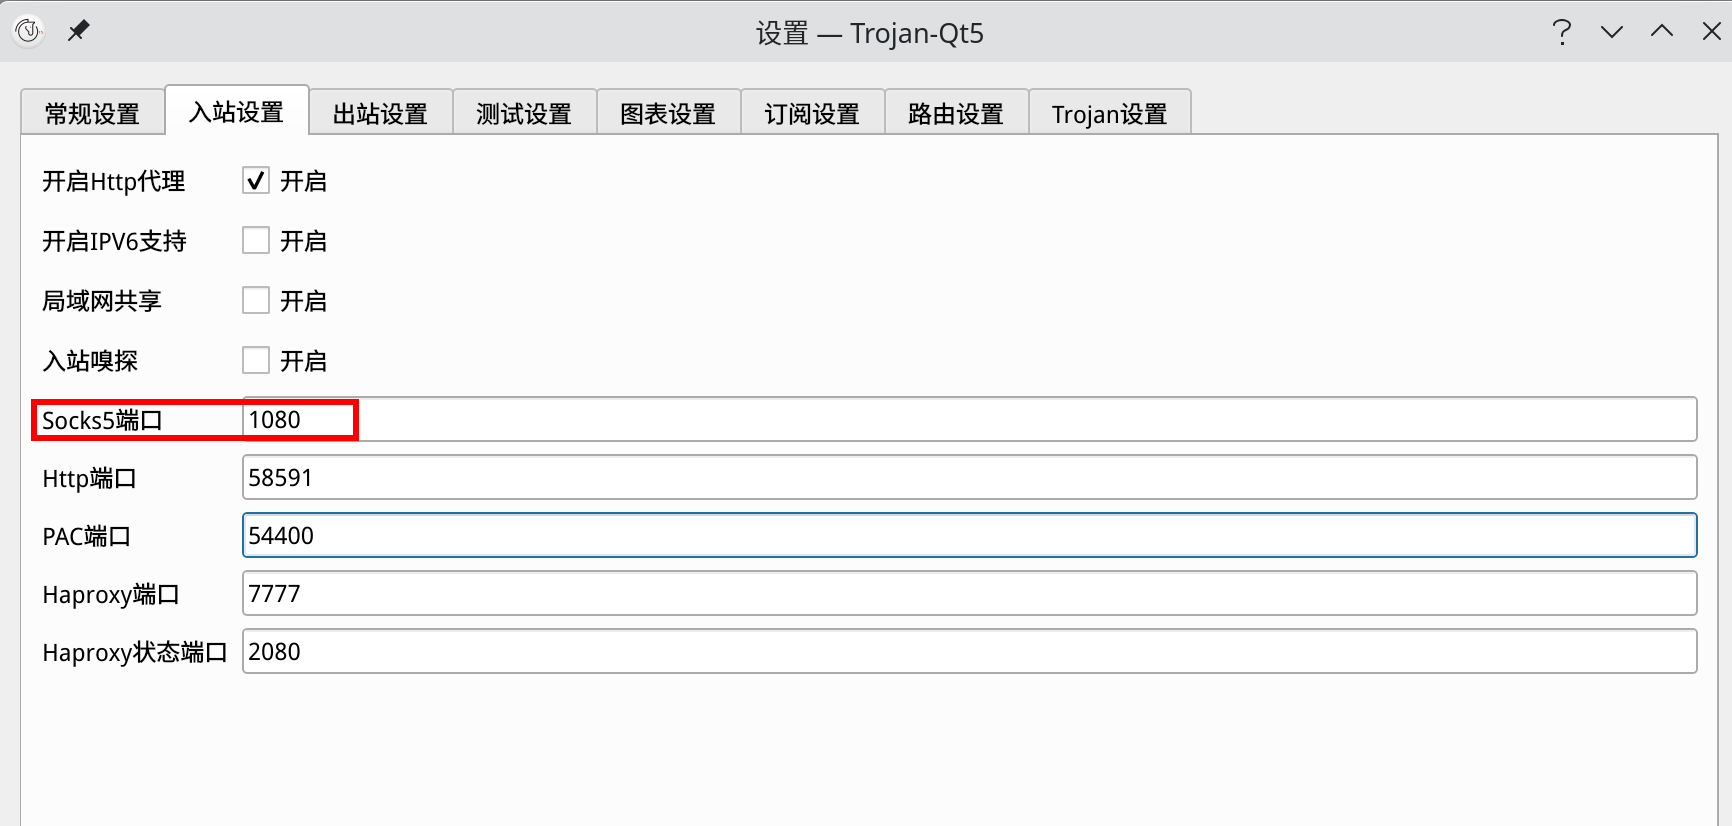
- 入站设置
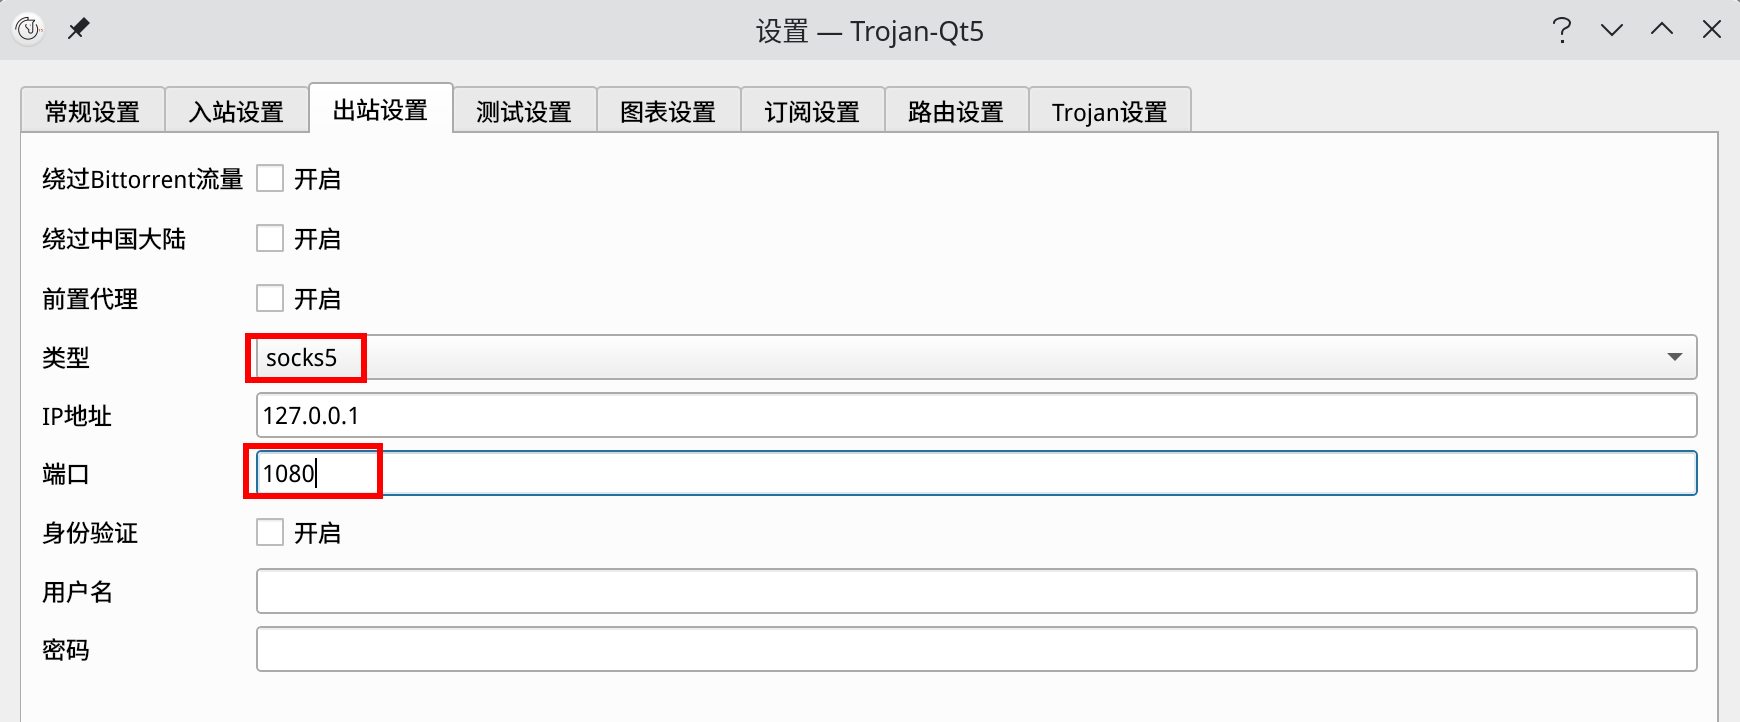
- 出站设置
配置完成后测试延迟,选择一个延迟较低的连接即可
使用 clash-for-windows
## 直接安装
$ yay -S clash-for-windows-chinese
安装完成后,直接界面配置,需要下载 clash 配置/url,加载成功后,选择一个延迟较低的连接即可。
配置 switchomega-proxy 为socks5 监听端口1080

安装并配置privoxy,启动服务
# 安装 privoxy
$ sudo pacman -S privoxy

# 配置配置文件,trojan 监听的是1080端口,转发端口为 8118
$ grep '^forward-socket' /etc/privoxy/config
listen-address  127.0.0.1:8118
forward-socks5t / 127.0.0.1:1080 .

# 启动 privoxy,并设置开机自启
$ sudo systemctl start privoxy.service && sudo systemctl enable privoxy.service
上述内容配置完成后,chrome 开启代理模式,然后登陆 google 帐号,各项配置、插件、书签会自动同步
# 安装wudao-dict
wudao-dict 是一个命令行下查单词的工具,日常看文档、wiki的时候有不清楚的单词,可以很方便的查询
$ cd ~/Downloads/linux
$ git clone https://github.com/chestnutheng/wudao-dict
$ cd ./wudao-dict/wudao-dict
$ sudo bash setup.sh
# 界面优化
配置系统托盘,在上尖点击右键,进入项目可以配置
unpin所有托盘图标
# 安装 numix 主题相关
numix 主题安装
命令行下安装 numix-folders 相关内容,可以调整 numix 默认的棕红色
$ sudo pacman -S python-dulwich
$ pamac build numix-icon-theme-git
$ pamac build numix-square-icon-theme-git
$ pamac build numix-circle-icon-theme-git
$ pamac build numix-folders-git
安装numix,进入终端,开启代理后再打开系统设置,不然可能下载不了 numix 主题,下载界面会一直报错
$ export http_proxy='http://127.0.0.1:8118'

# 打开界面后,进入主题安装,搜索 numix 进行安装
$ /usr/bin/systemsetting
更改 numix 默认的文件夹颜色
# 打开界面后,自行选择颜色
$ sudo numix-folders
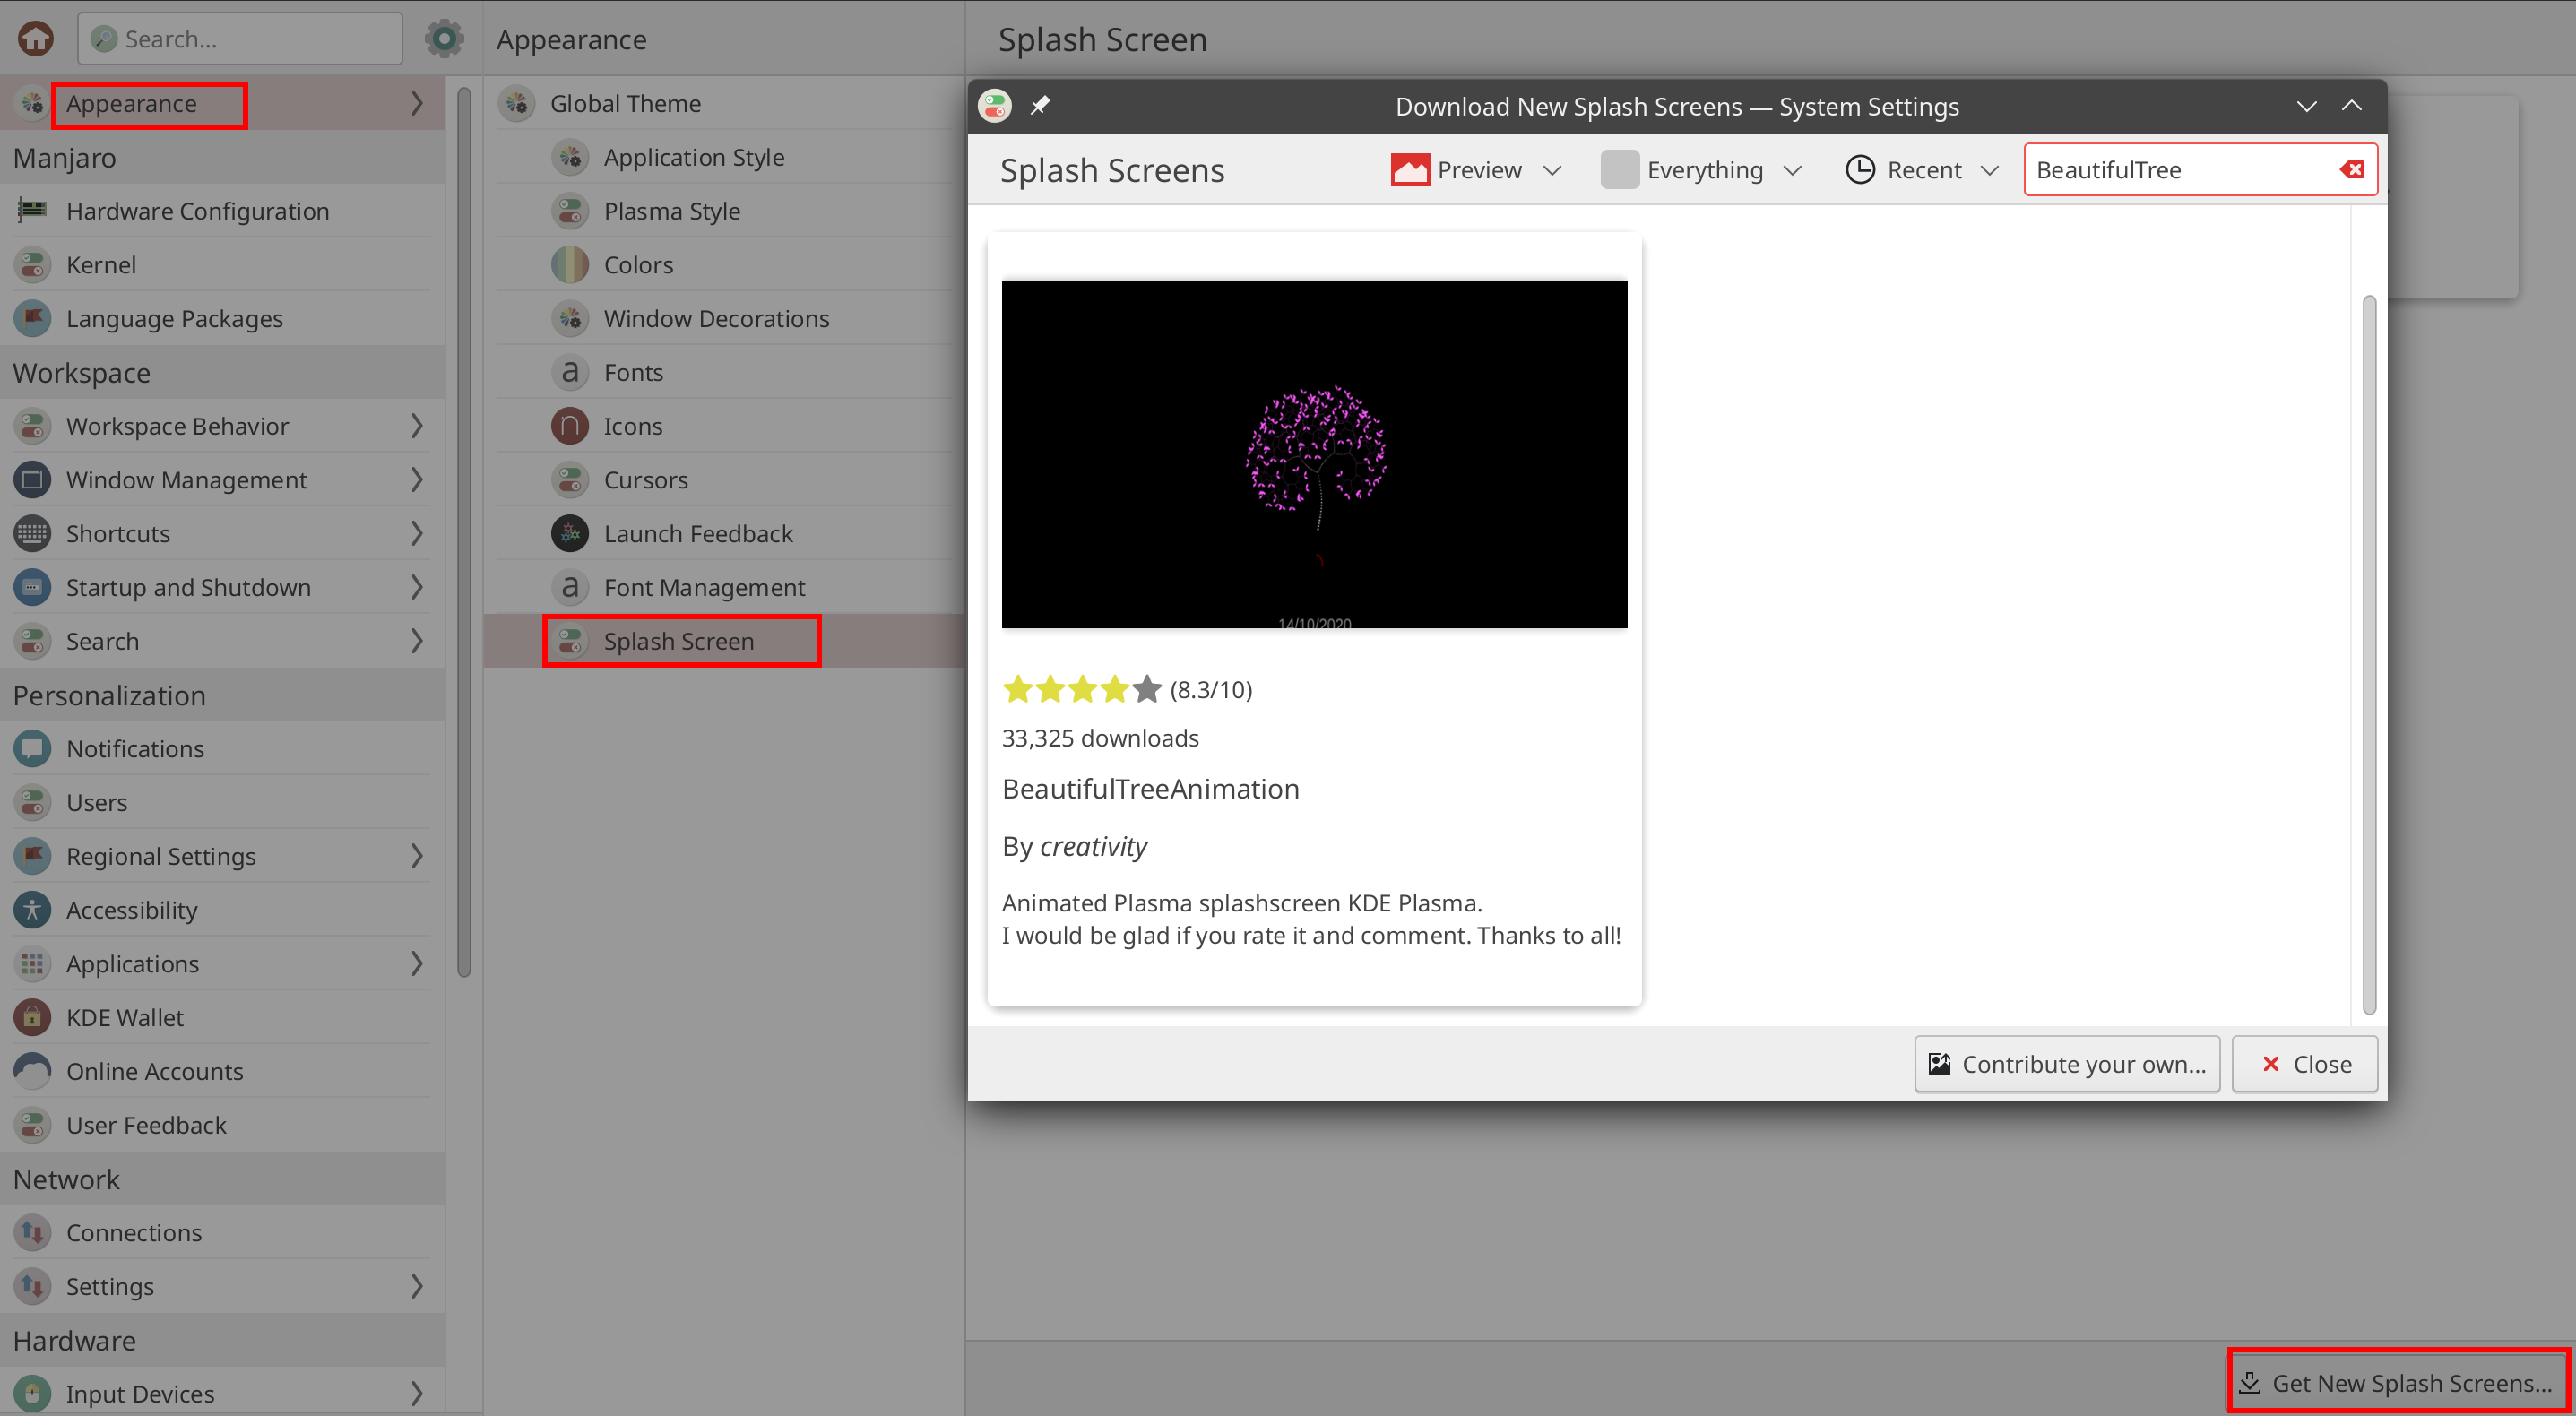
splash screen配置
如下图,选择自己喜欢的安装即可
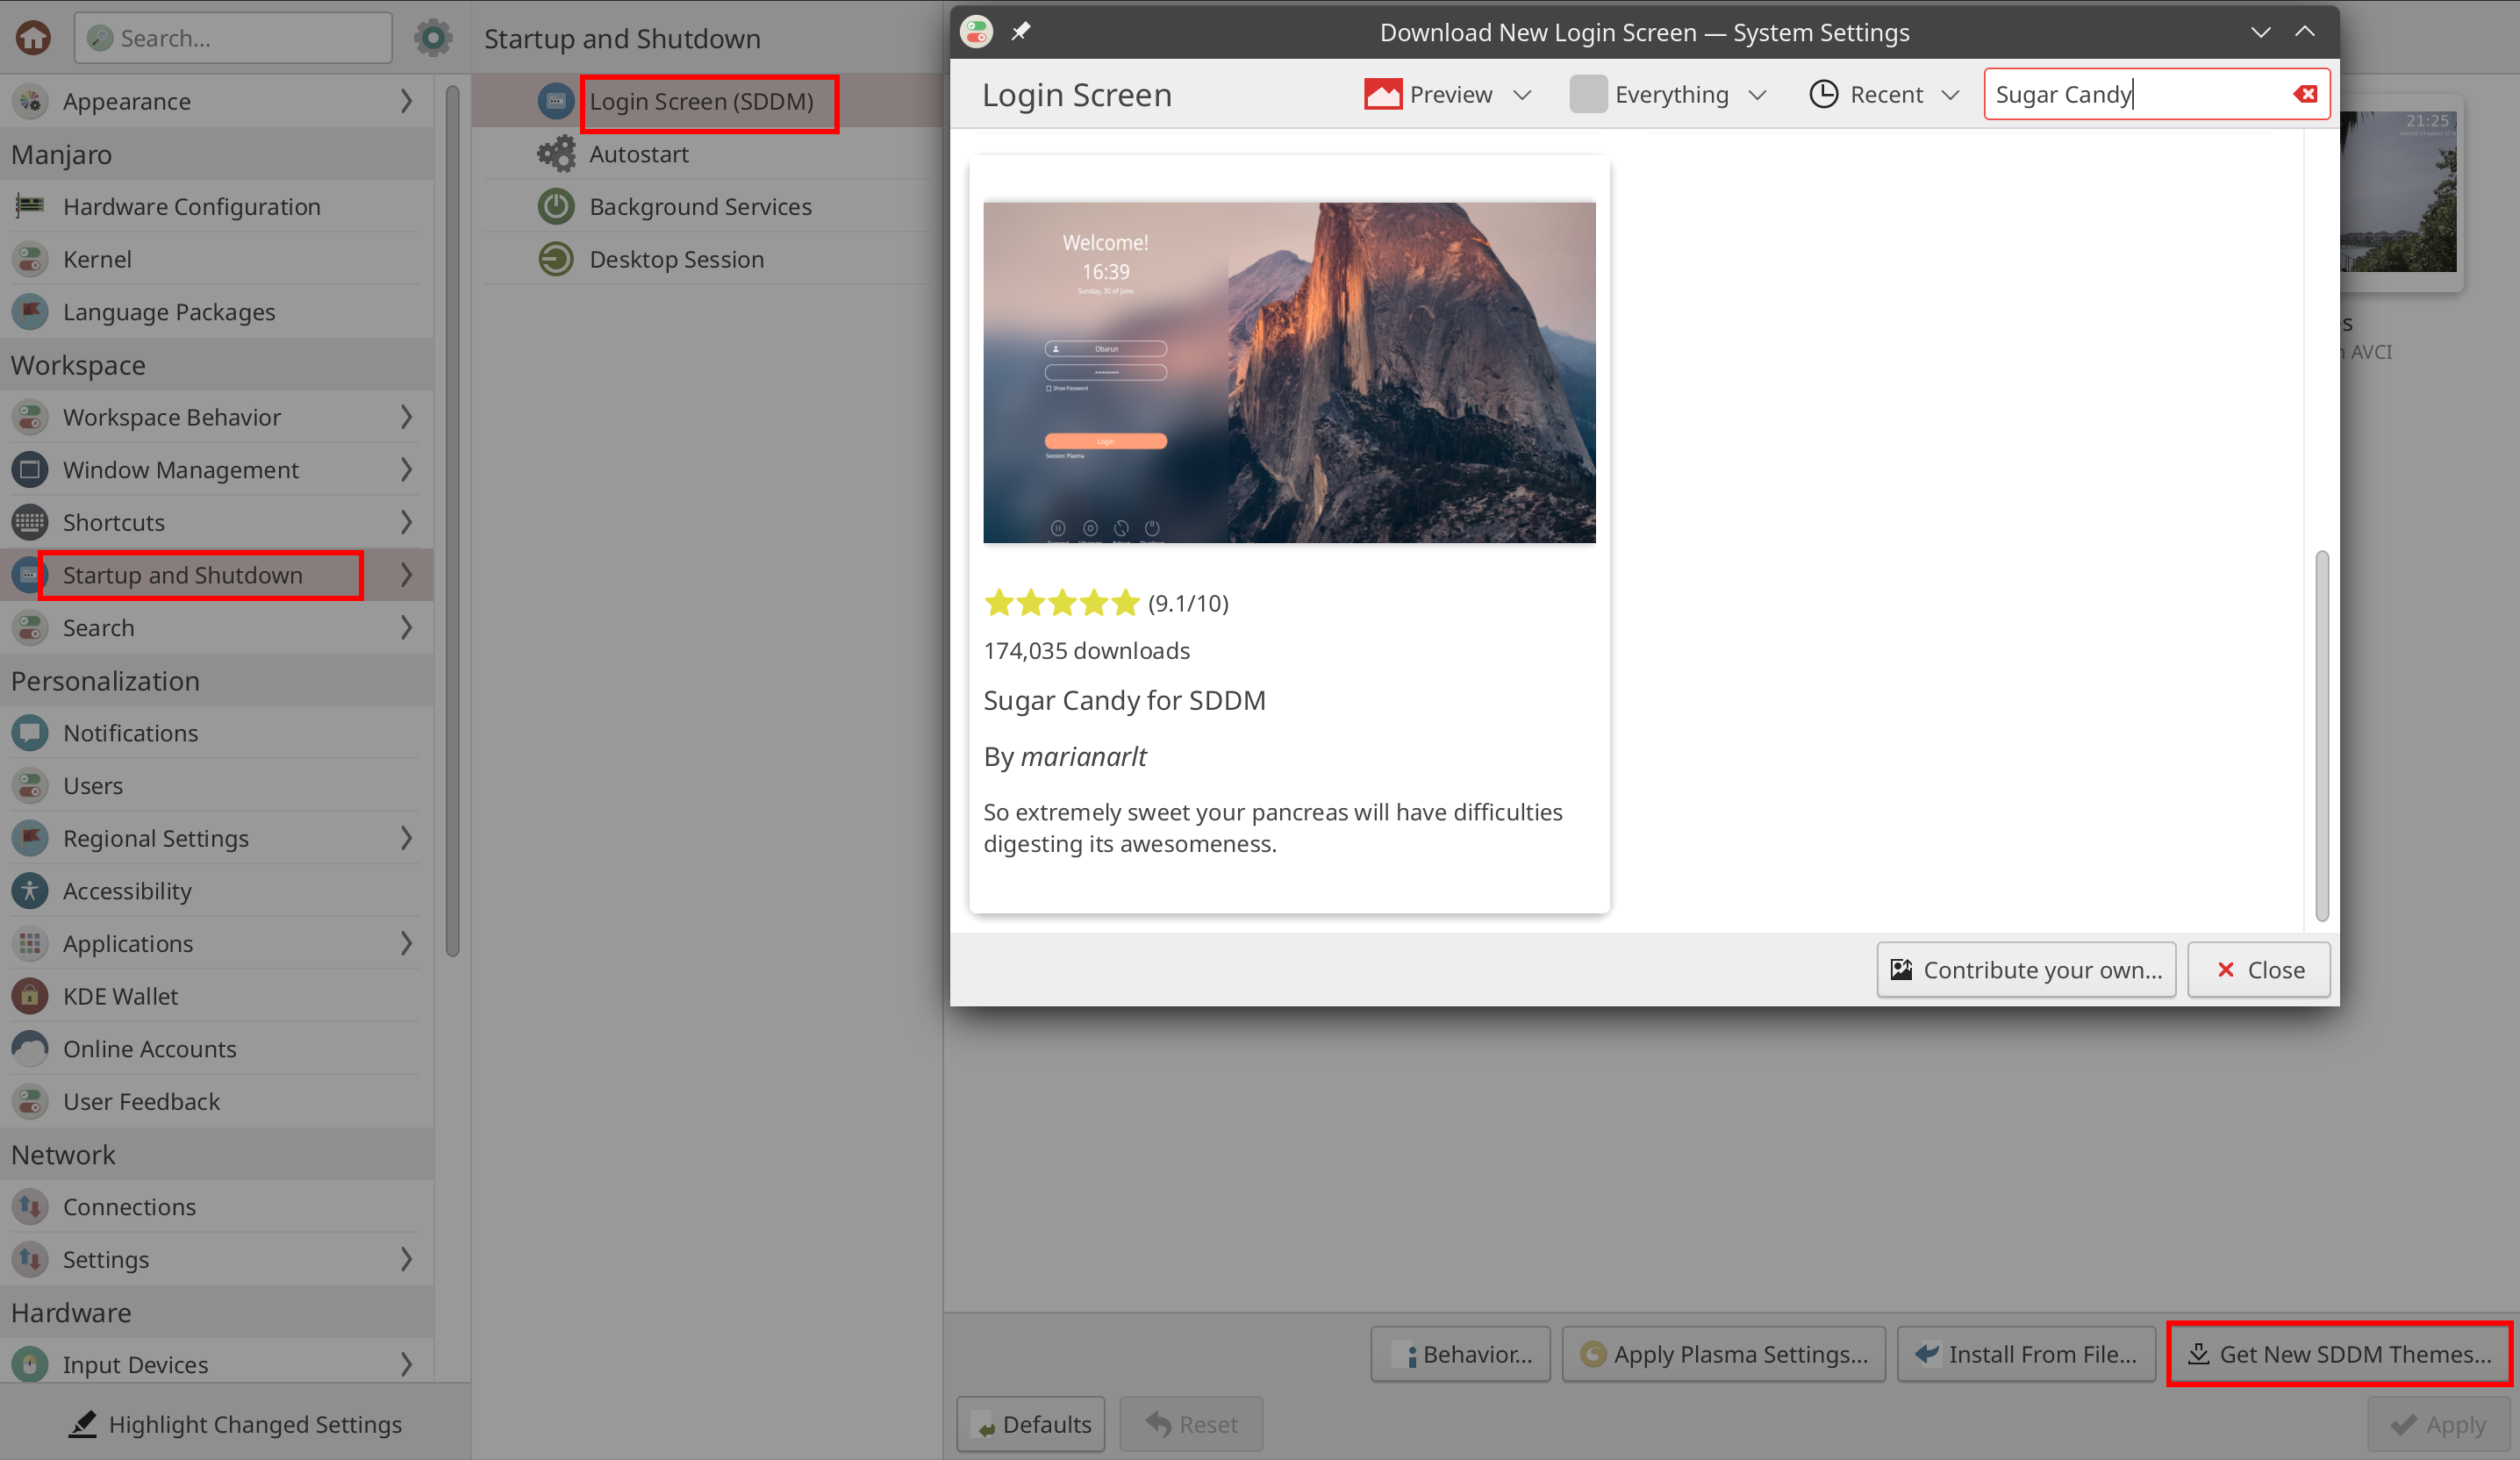
SDDM 配置
如下图,选择自己喜欢的安装即可
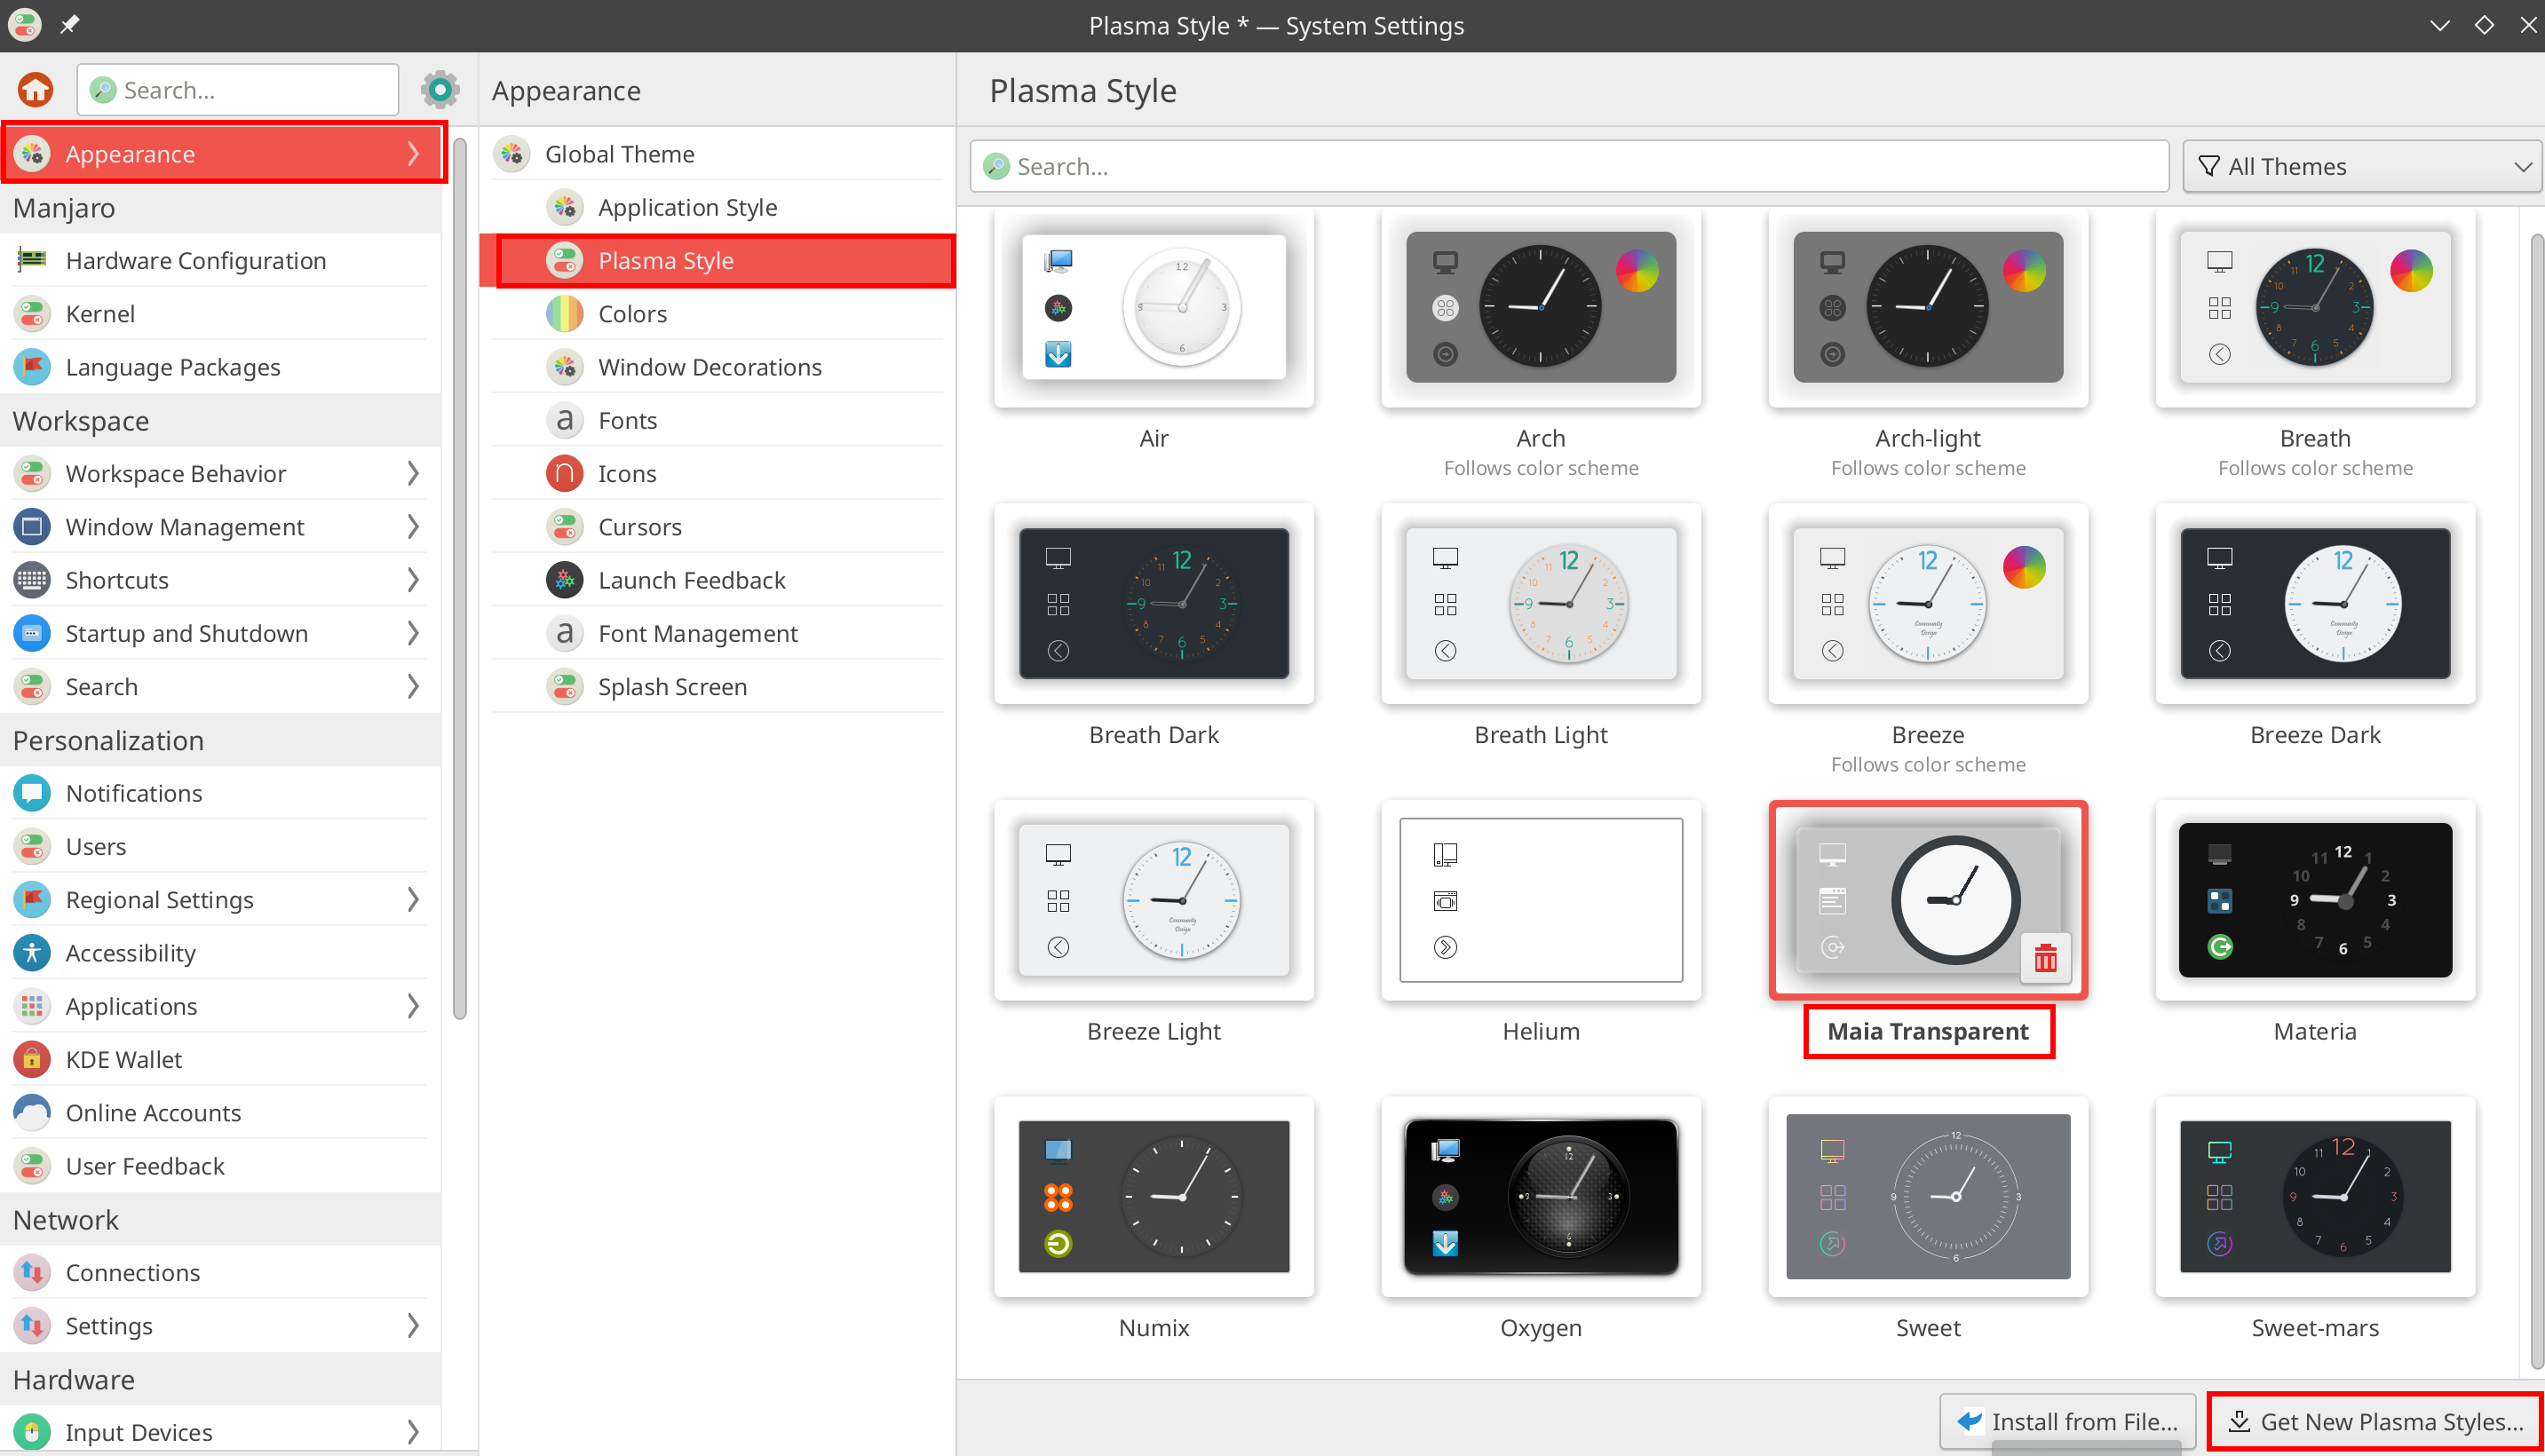
Plasma style配置
如下图,选择自己喜欢的进行安装
锁屏配置
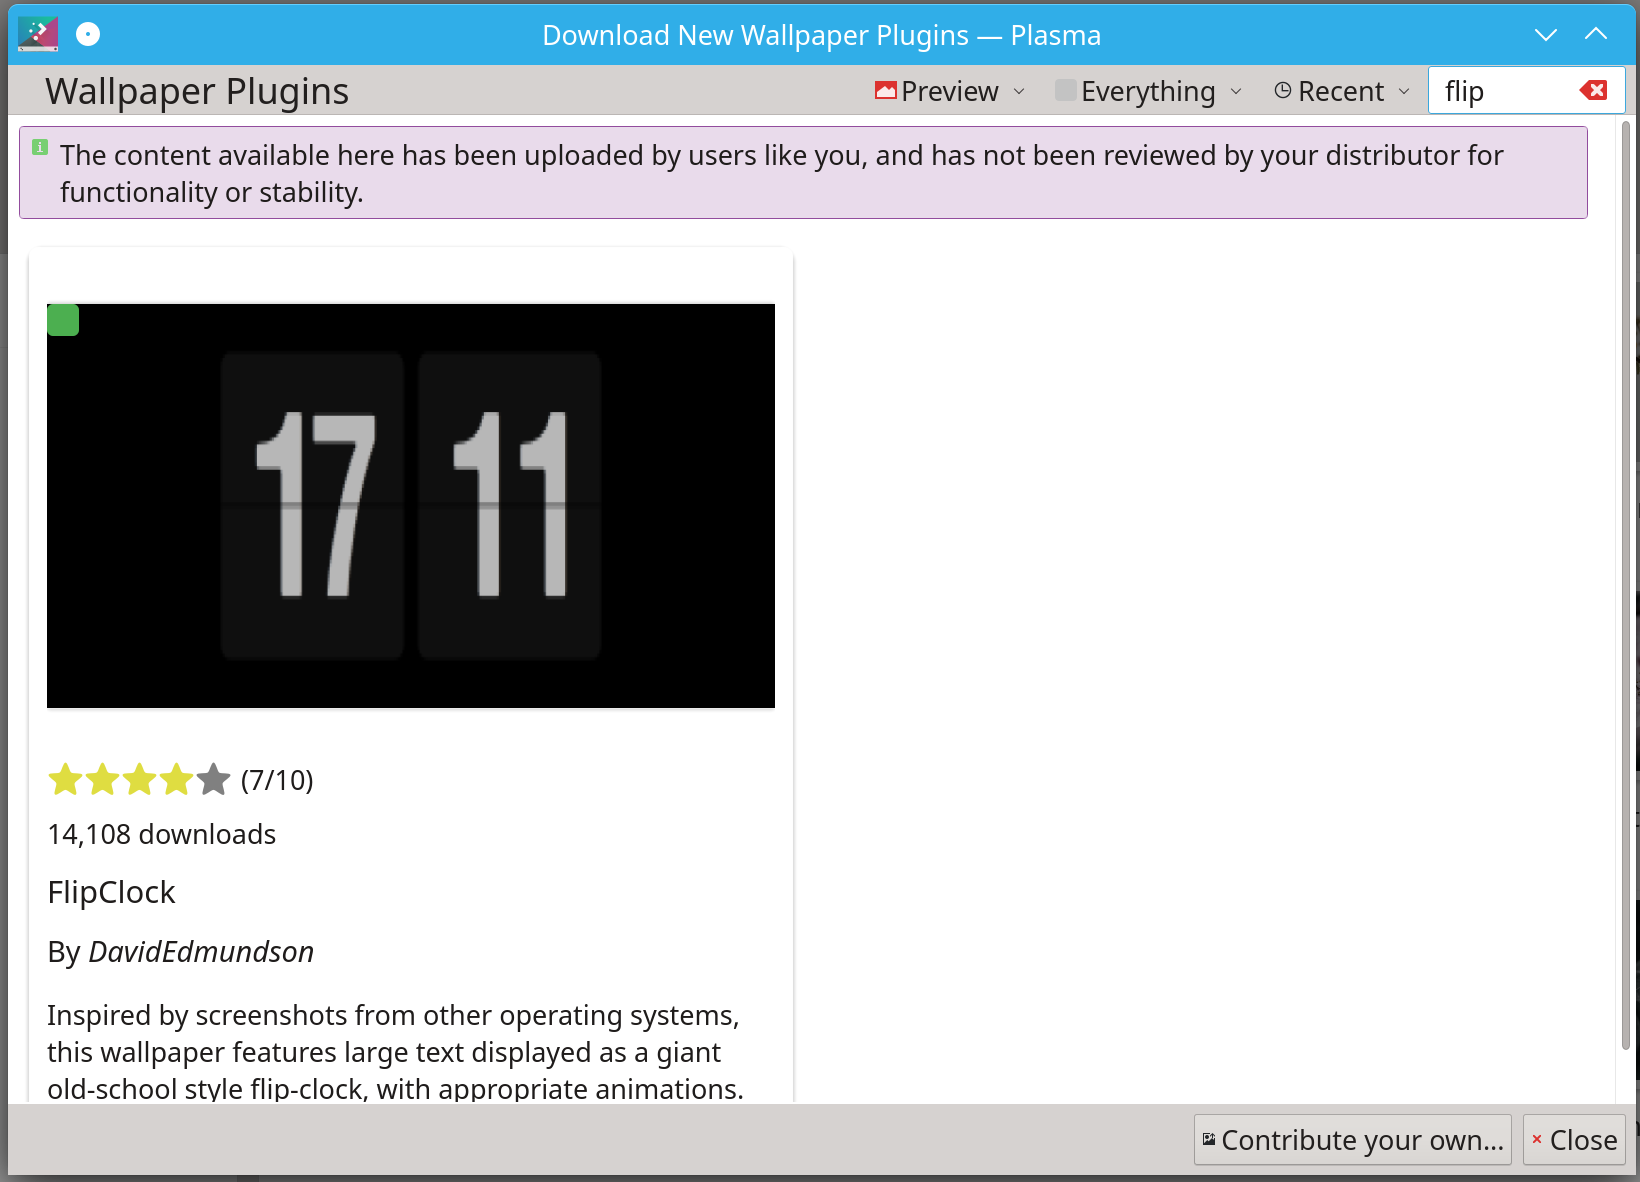
如下图,先安装 wallpaper plugin flipclock
入口:桌面空白处右键/configure desktop and wallpaper/wallpaper type/get new plugins
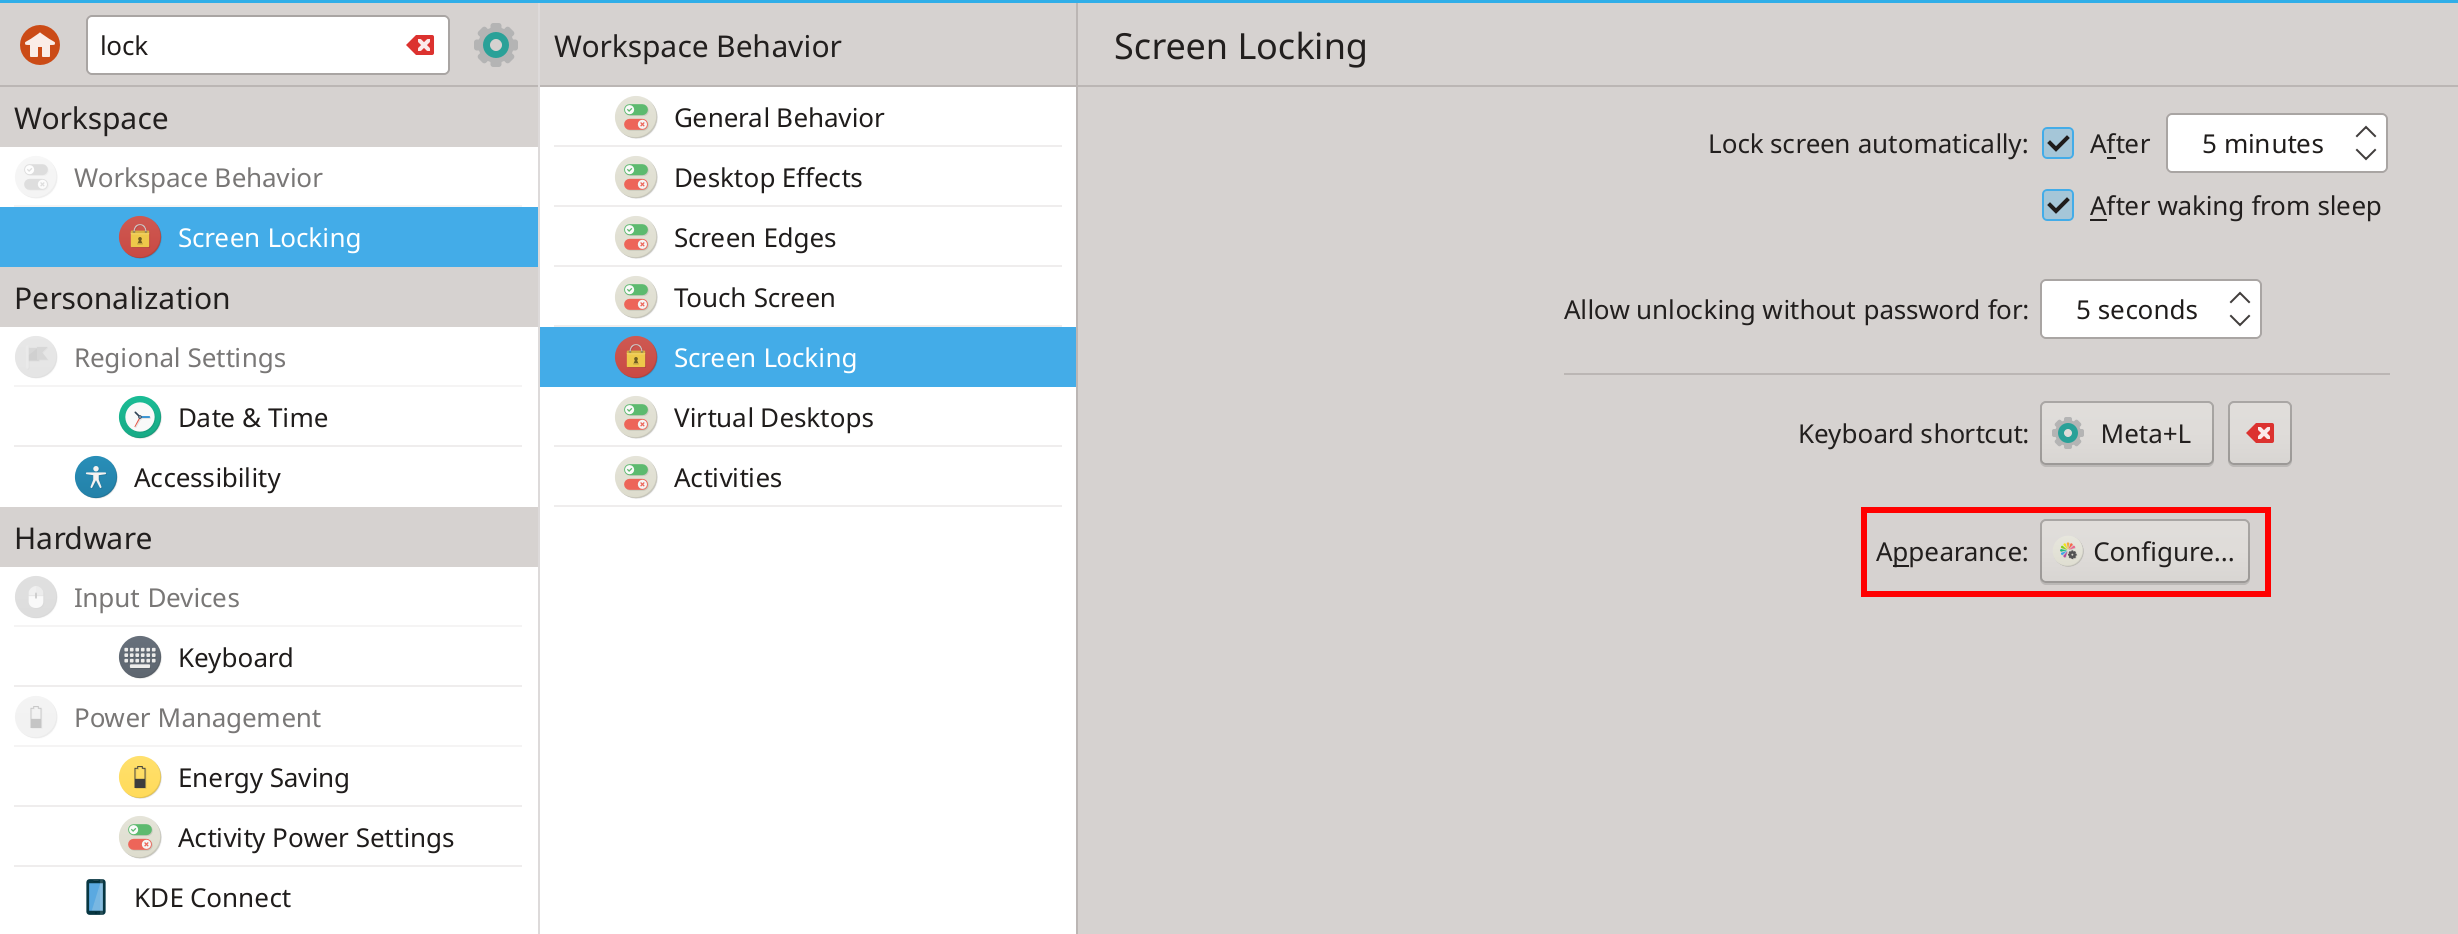
如下图,配置锁屏界面
入口:system settings/workspace behavior/screen locking/apperance/configure/wallpaper type/flipclock
# 语言设置
切换默认语言,可以自行设置
入口:
system settings/regional settings/languages
- 要从中文切换为英文,添加语言选择
American English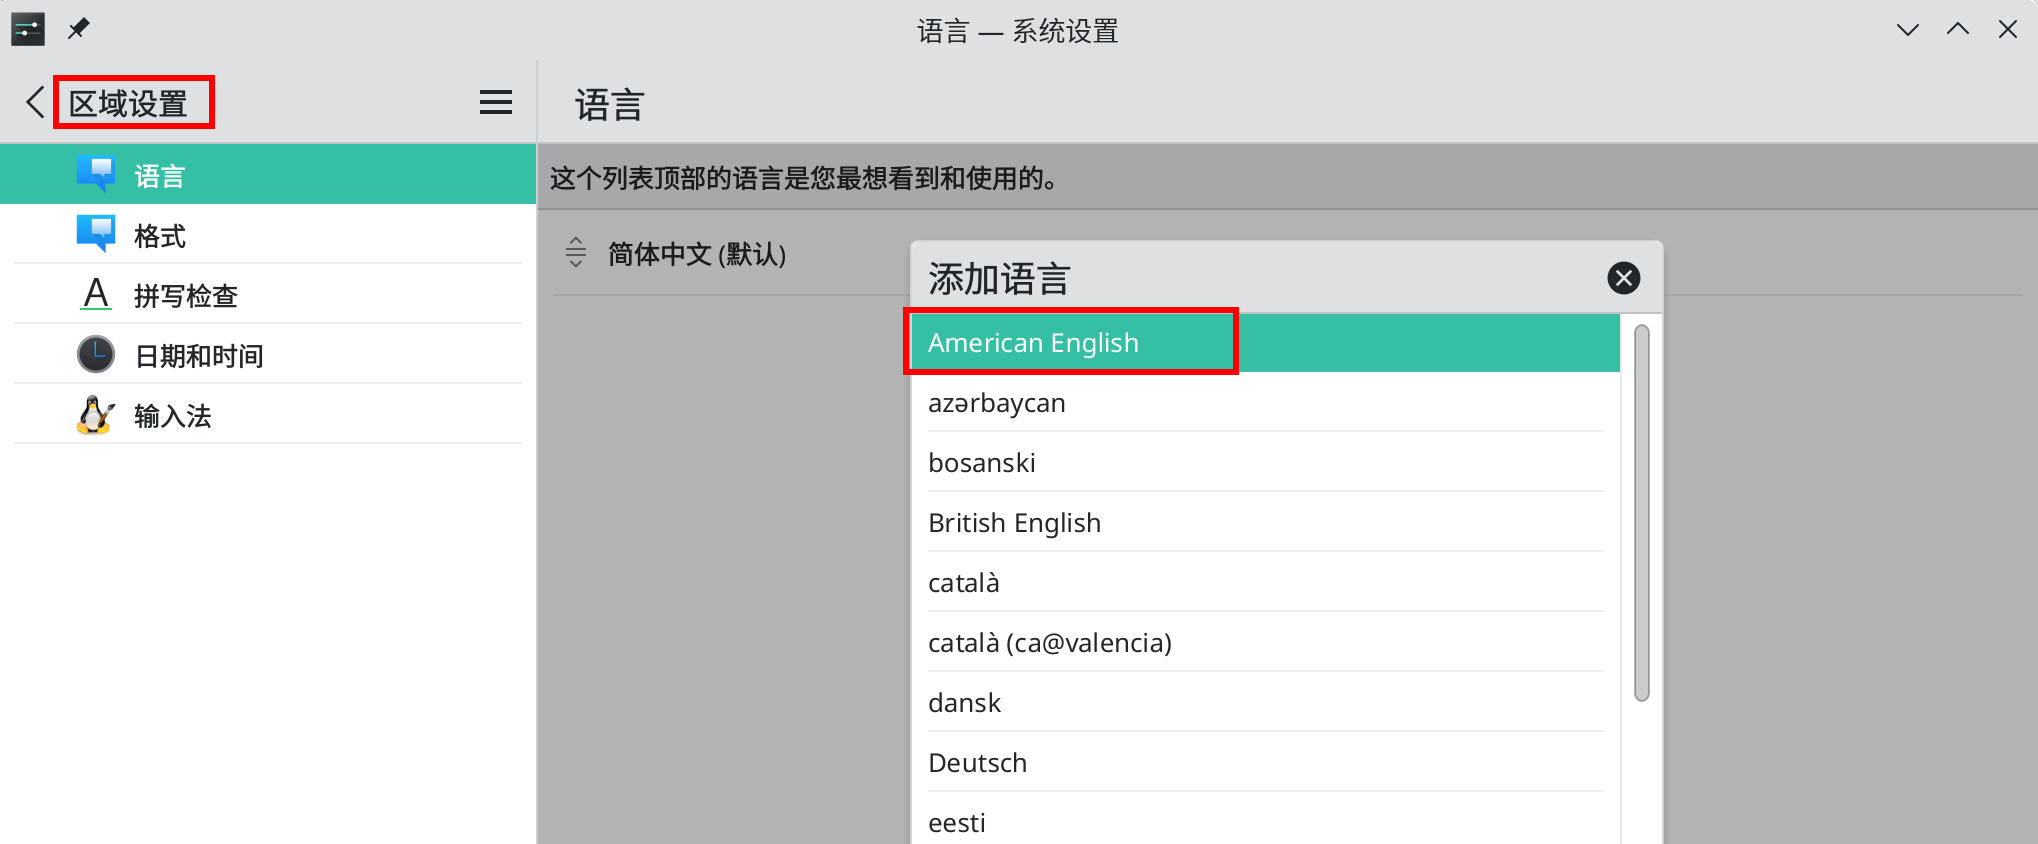
- 调整语言顺序
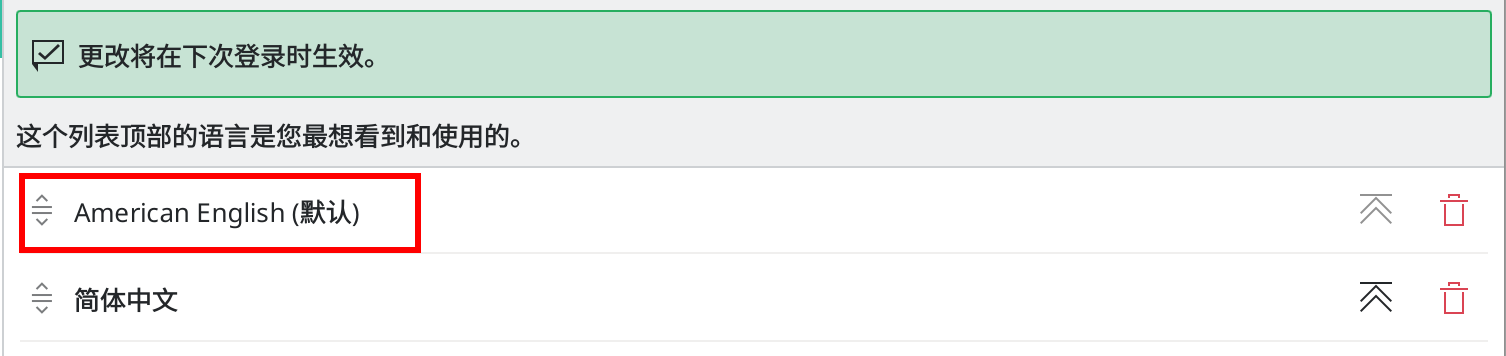
logout再登陆,配置生效
# 快捷键配置
设置一些快捷键,方便日常使用
入口:
system settings/shortcuts/custom shortcuts/Edit/New/Global shortcuts/Commands URLs
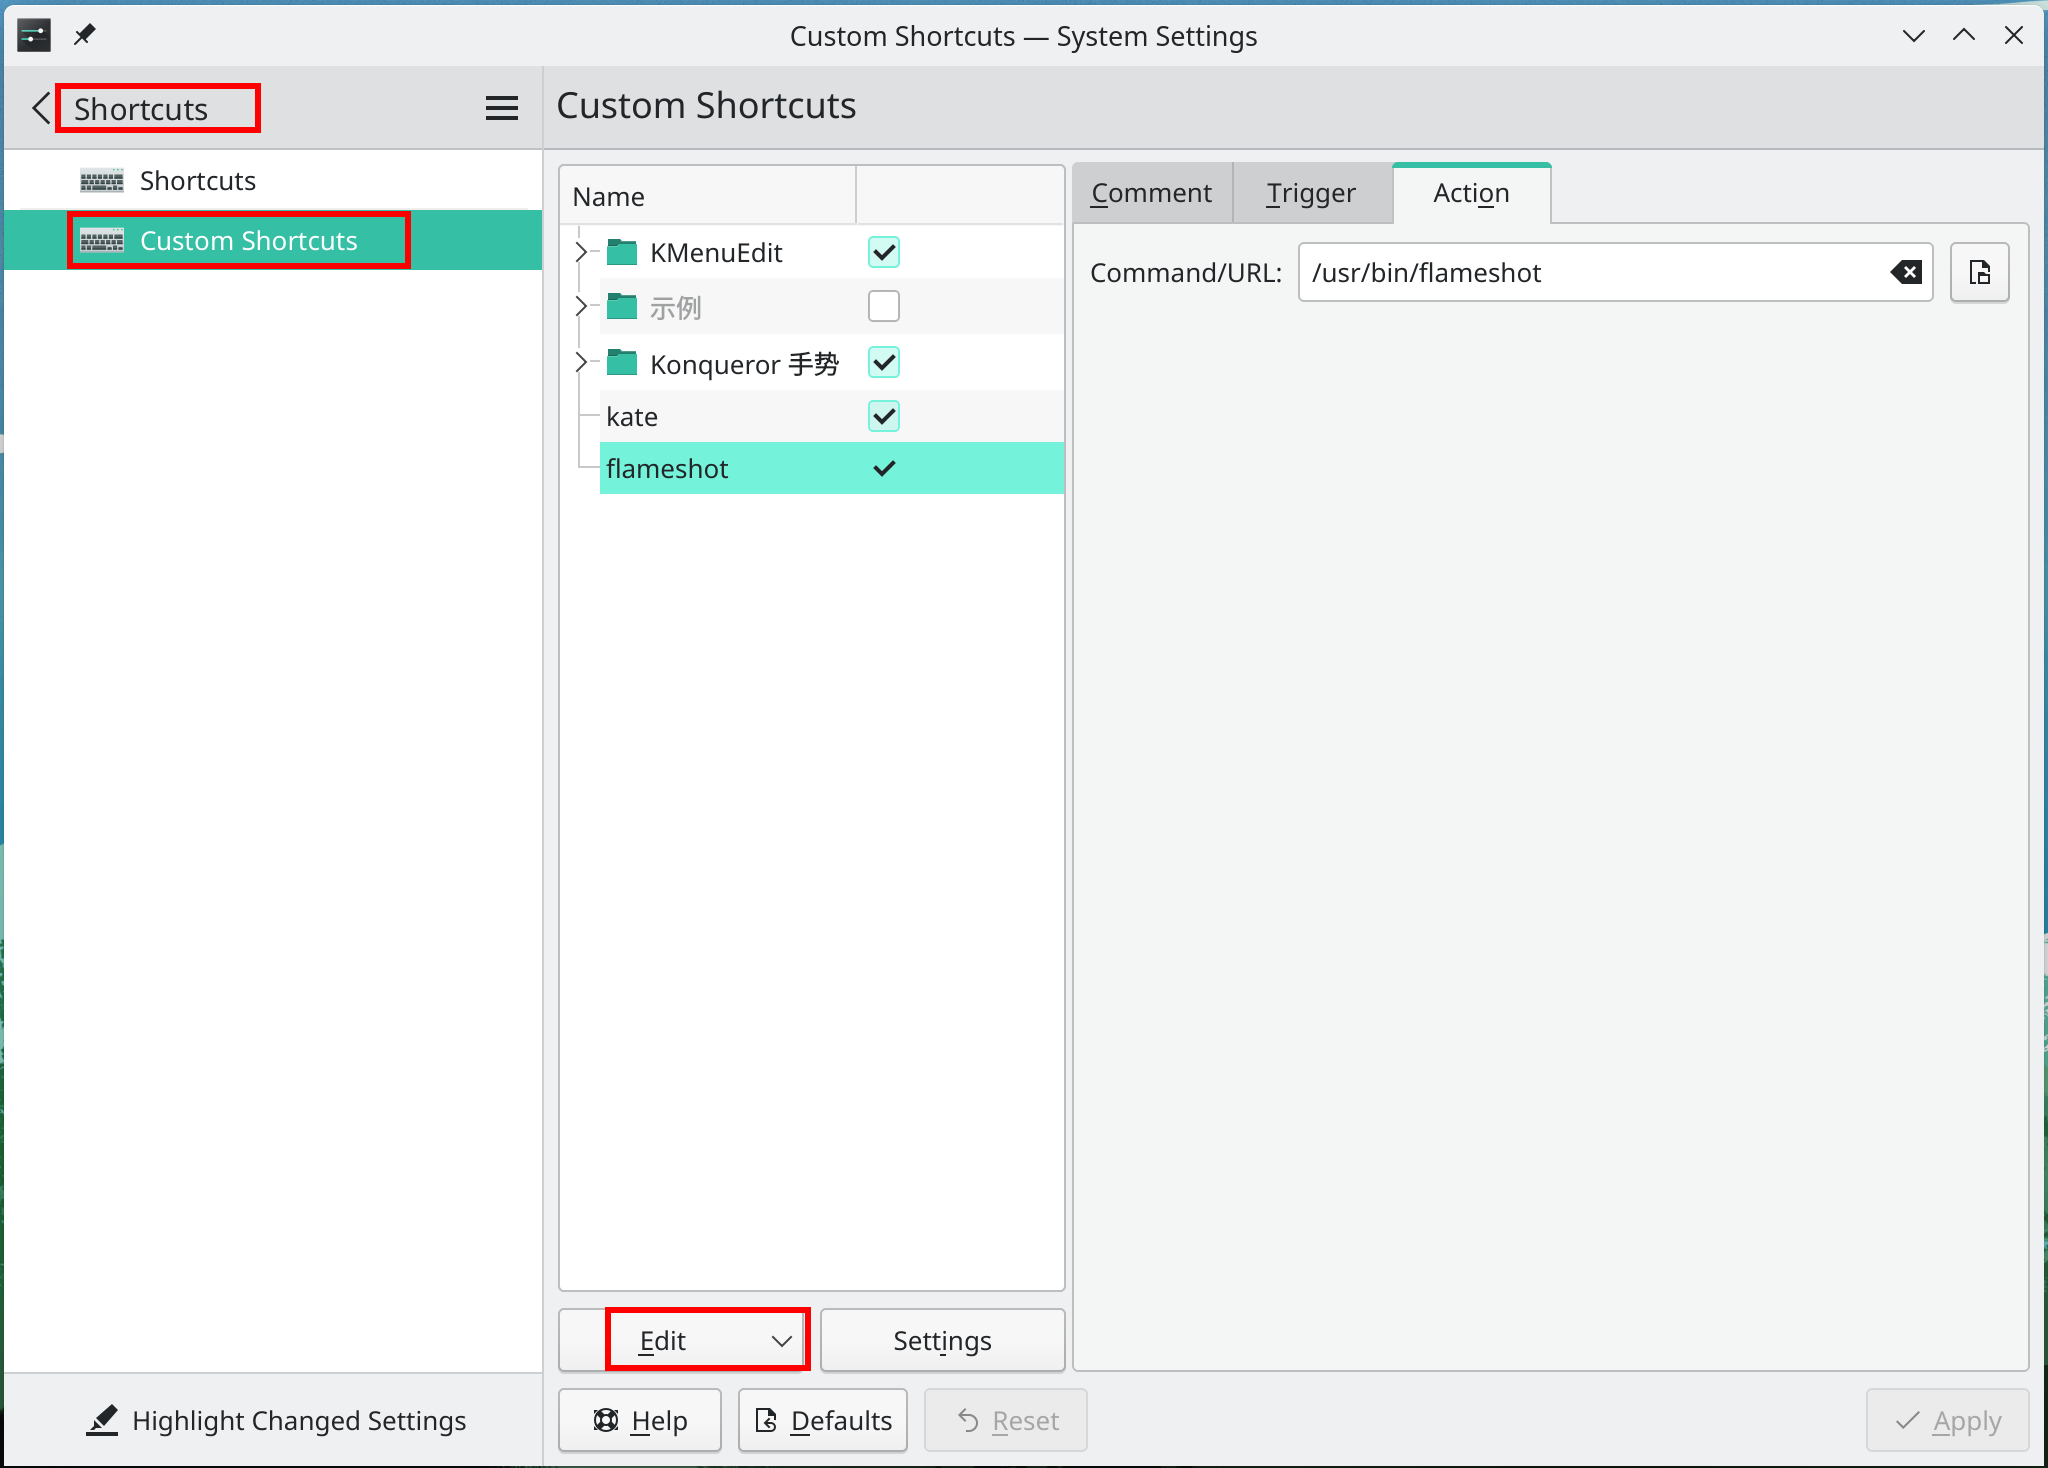 这边添加的有:
google-chrome、kate、virtualbox、dolphin
其他
参考内容: